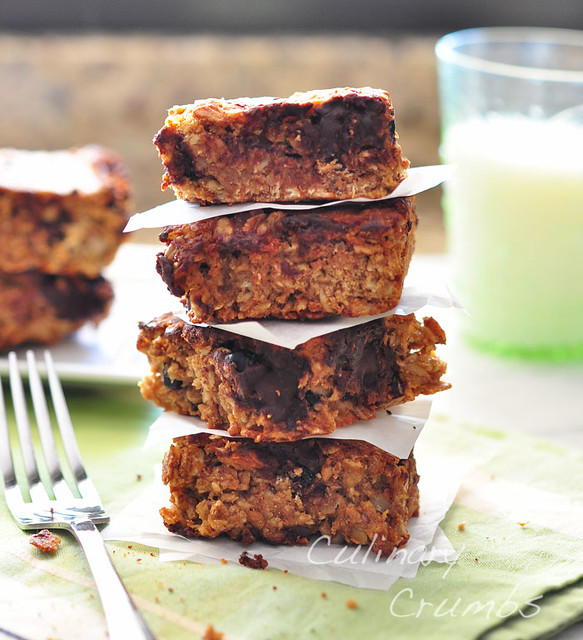
I’m not going to rehash my constant struggle of healthy eating and weight loss with you. I’m certain we’ve discussed that topic before. But one thing I will mention, and surely I’m not the only one in a constant diet cycle who feels this way, is how much I loathe store bought protein bars. Somehow though, they’re always a staple on my grocery list and they can always be found in my desk drawer at work. But just as certain as this, is the fact that you will almost always find the opened wrapper still gripping to half of that partially eaten protein bar. In the trash bin. You see, I have a very hard time choking the whole dry and mealy thing down.
Showing posts with label Chocolate. Show all posts
November 3, 2012
September 22, 2012
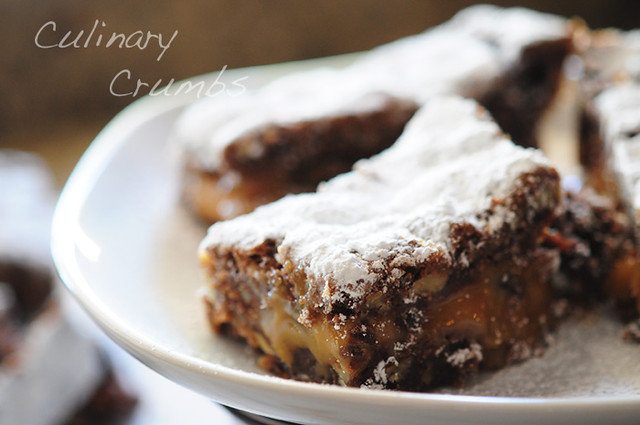
Knock You Naked Brownies
If you knew me well, you would know that I can almost always relate a life experience to an episode of Friends. It’s one of my many valuable and indispensable traits. Quoting one-liners from Ross, Rachel, Chandler, Joey, Monica or Phoebe has become almost a pastime for my family. We do it so often, in fact, that it has really become second nature. It’s scary sometimes. Perhaps though, it’s because I can relate to those characters so much, especially Monica with her obsessive behavior and OCD like qualities where everything has to be in its place and freakishly clean. Yep. That’s me.
There is one particular episode where Monica physically exhausts herself to make the apartment guest ready, complete with a presentation of baked goods, and as the other Friends arrive, she proclaims in a voice of exasperation, yet contentment “I’m always the hostess.” Well, that’s me too. I feel such a burning need to provide and impress guests sometimes that it can become overwhelming and stressful. I know I’m not alone in these emotions, but even when I tell myself that there is simply not enough time or resources to project the welcoming I intend to, my need to be a good hostess almost always takes over.
December 24, 2011
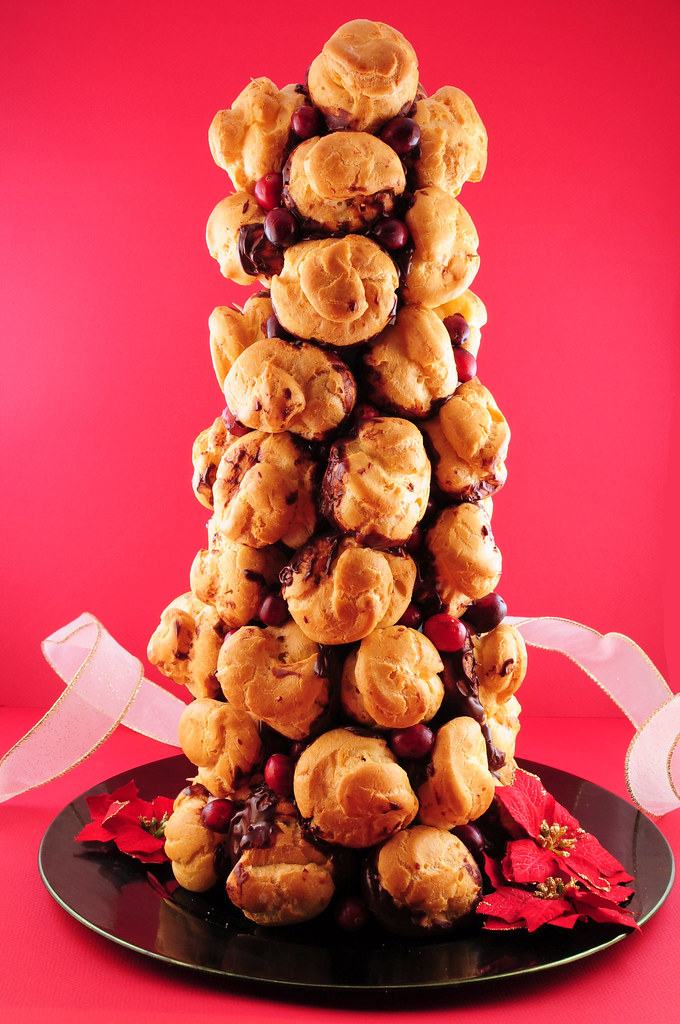
Christmas Croquembouche
It happened again, just as it does every year. No matter how down on my luck I might be, you can guarantee that I will be bitten by the Spirit of Christmas year after year. I don't think anyone can help it, really. As soon as December 1st arrives, that holiday magic bursts into the air, spreading the Christmas Spirit. It's contagious and it spreads quickly too. All it takes is a simple wave to your neighbor and the wish of a Happy Holiday or a (less politically correct) Merry Christmas.
I've been sick with the holiday cheer now for about three weeks. I thought I had a pretty bad case of it, that is until I got home, back to Dallas, to my parents house. My mom brings Christmas to life. The walls reverberate with the Spirit of Christmas. The sheer amount of decorations in the house is astonishing, but it makes you feel so warm and cozy inside. You almost expect Santa and his elves to pop out from behind the corner somewhere.
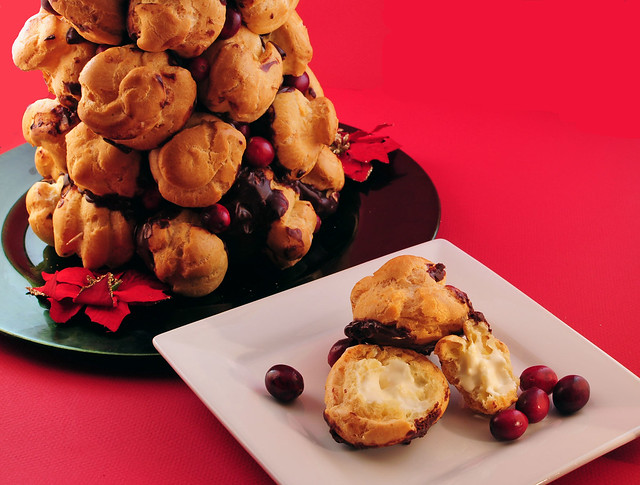
The Christmas Spirit that lives inside my parent's house inspired me to go the extra mile with a Christmas dessert this year. I wanted it to embody this time of year. Now tell me, what represents Christmas more than a Christmas Croquembouche? It even looks like a Christmas tree!
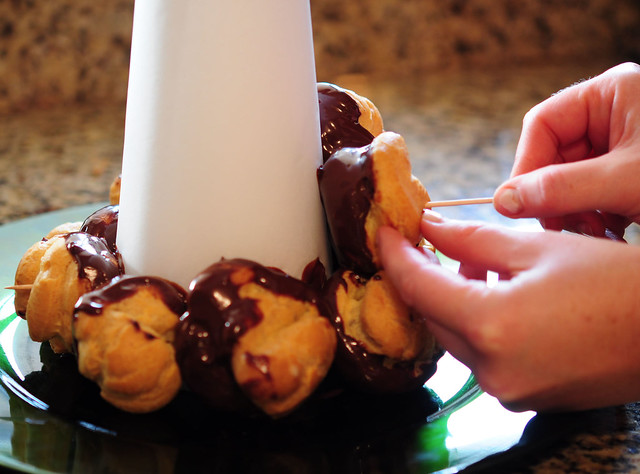
I'm not going to lie. It took pretty much all day to make. Granted, I'd have to stop to make things look pretty and take pictures, but all in all it was rather time consuming. I even used a less traditional method that involves a styrofoam cone base. (A traditional croquembouche would be made purely of cream puffs, from the center out).
If I was going to make this again, and I just might have to, because it does make for a stunning presentation, I would break up the work. The cream puffs, which make up the majority of the work, could be made two days ahead, the pastry cream filling and chocolate sauce made 1 day ahead, leaving the assembly for the morning of a festive Christmas get together. Hey, you could even buy frozen cream puffs, eliminating most of the work, and taking all the credit for yourself. Just don't tell anyone I told you so. Merry Christmas!
Croquembouche
Recipe Adapted from Epicurious.com
Ingredients:
For cream puffs (pâte à chou):
- 1 1/4 cups water
- 1 1/2 sticks unsalted butter, cut into 1/2" pieces
- 1/2 tsp salt
- 1 1/2 cups all-purpose flour
- 6 large eggs
For pastry cream filling:
- 1 1/2 cups half and half
- 1/2 cup granulated sugar
- 2 large eggs
- 1 large egg yolk
- 2 tbsp all-purpose flour, sifted
- 2 tsp vanilla extract
- 1 cup heavy cream
For chocolate sauce:
- 1 1/2 cups heavy cream
- 9 oz bittersweet or semisweet chocolate, finely chopped
Assorted decorations of your choice: fresh cranberries, red hots, red and green M&Ms, silver dragées
Special Equipment:
Large pastry bag with 1/2-inch and 1/4-inch plain tips
clear tape
14-inch styrofoam cone (I bought mine at Michael's)
parchment paper
lots of toothpicks
Directions:
For cream puffs (pâte à chou):
1. Preheat oven to 425º F.
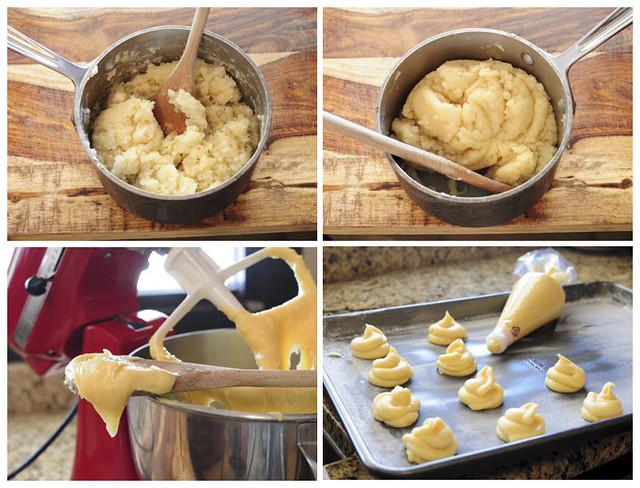
3. Transfer dough to the bowl of a standing electric mixer and beat in 6 eggs, 1 at a time, on high speed, beating well after each addition. Pâte à chou batter should be stiff enough to hold soft peaks and fall softly from a spoon.
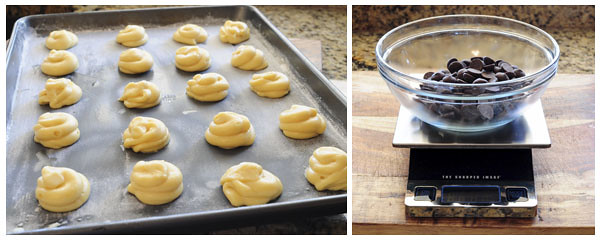
4. Butter and flour 2 baking sheets. Spoon pâte à chou into a large pastry bag fitted with a 1/2-inch plain tip and pipe about 55 mounds onto baking sheets, each about 1 1/2 inches in diameter, leaving 1 1/2 inches between mounds. With wet fingertips, gently smooth pointed tip of each mound to round puffs.
5. Bake puffs in upper and lower thirds of oven 10 minutes, switching position of sheets in oven halfway through baking. Reduce temperature to 400°F. and bake puffs 20 minutes more, or until puffed and golden, again, switching position of sheets in oven halfway through baking. Let puffs stand in turned-off oven 20 minutes. Transfer puffs to racks to cool.
6. With a skewer, poke a 1/4-inch hole in bottom of each puff. Cream puffs may be made 2 days ahead and kept in an airtight container. Re-crisp puffs in 400°F oven 5 minutes and cool before filling. If making puffs ahead of time, wait to poke holes in each until after re-crisping and ready to assemble.
For Pastry Cream Filling:
1. Bring half and half to simmer in a heavy medium saucepan. Whisk sugar, eggs, egg yolk and sifted flour in a medium bowl to blend.
2. Gradually, and very slowly, whisk in hot half and half as to temper the egg mixture. Transfer mixture back into the saucepan. Whisk over medium-low heat until mixture thickens and comes to boil, about 5 minutes. Boil 1 minute. Pour into another medium sized bowl. Stir in vanilla. Press plastic onto surface of pastry cream. Cover and chill until cold, about 4 hours. (The pastry cream can be made up to this point 1 day ahead. Keep chilled.)
3. On the day your croquembouche will be assembled, place chilled pastry cream base into the bowl of a standing electric mixer. Beat pastry cream until just smooth and soft enough to fold in heavy cream (do not overbeat).
4. In a chilled bowl with cleaned beaters, beat heavy cream until it holds soft peaks. Fold whipped cream into pastry cream. Chill filling, covered, about 1 hour, or until cold.
For Pastry Cream Filling:
1. Bring half and half to simmer in a heavy medium saucepan. Whisk sugar, eggs, egg yolk and sifted flour in a medium bowl to blend.
2. Gradually, and very slowly, whisk in hot half and half as to temper the egg mixture. Transfer mixture back into the saucepan. Whisk over medium-low heat until mixture thickens and comes to boil, about 5 minutes. Boil 1 minute. Pour into another medium sized bowl. Stir in vanilla. Press plastic onto surface of pastry cream. Cover and chill until cold, about 4 hours. (The pastry cream can be made up to this point 1 day ahead. Keep chilled.)
3. On the day your croquembouche will be assembled, place chilled pastry cream base into the bowl of a standing electric mixer. Beat pastry cream until just smooth and soft enough to fold in heavy cream (do not overbeat).
4. In a chilled bowl with cleaned beaters, beat heavy cream until it holds soft peaks. Fold whipped cream into pastry cream. Chill filling, covered, about 1 hour, or until cold.
For chocolate sauce:
1. Bring heavy cream to a simmer in a medium saucepan. Remove from heat and add chopped chocolate; stir until chocolate is melted and smooth. Cool sauce until lukewarm. (Sauce can be prepared 1 day ahead. Cover and refrigerate. When ready to assemble croquembouche, rewarm over low heat until just lukewarm and pourable, stirring frequently.)
To assemble the croquembouche:
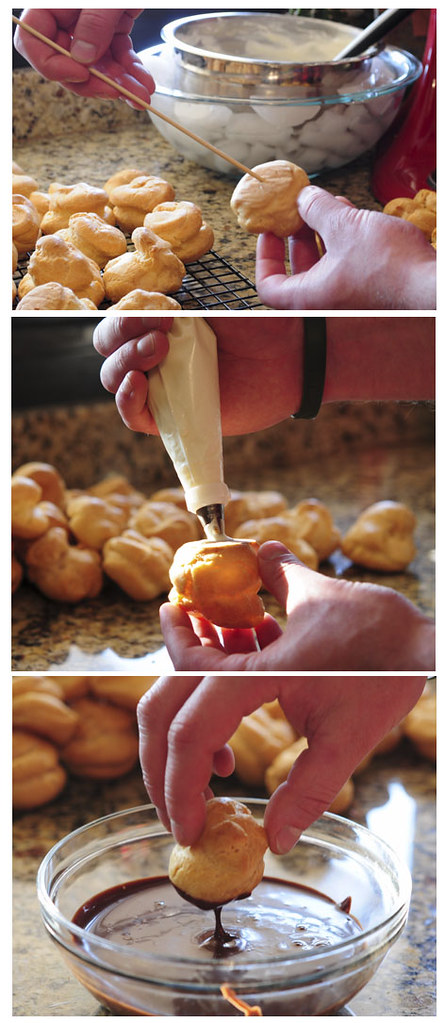
1. To fill the cream puffs, transfer pastry cream filling to a large pastry bag fitted with a 1/4-inch plain tip. Insert the tip into the hole in the bottom of each cream puff and barely fill each puff (do not overfill). Set filled puffs aside.
2. Using tape, cover styrofoam cone with parchment paper. Double tape to secure the bottom of cone to a serving platter.
3. Line a tray with wax paper. Working with 1 filled cream puff at a time, dip bottom in chocolate sauce, leaving top 1/3 inch uncoated and letting excess drip off. Set aside on wax paper.
4. Once cream puffs are dipped, arrange 1 ring of puffs around base of cone, placing as closely together as possible and inserting a toothpick through each puff into cone, so as to attach puff to cone. Push toothpick as far into cone as possible.
5. Attach second ring of puffs above first, again packing tightly and staggering so puffs in second ring are not directly above puffs in first ring. Continue in same manner to attach remaining puffs. Finish covering cone with 1 puff attached to the top of cone.
6. Decorate by pushing cranberries, M&Ms, red hots or dragées into the gaps and spaces between the cream puffs.
7. To serve croquembouche, dismantle, 1 puff at a time and enjoy!
1. Bring heavy cream to a simmer in a medium saucepan. Remove from heat and add chopped chocolate; stir until chocolate is melted and smooth. Cool sauce until lukewarm. (Sauce can be prepared 1 day ahead. Cover and refrigerate. When ready to assemble croquembouche, rewarm over low heat until just lukewarm and pourable, stirring frequently.)
To assemble the croquembouche:
1. To fill the cream puffs, transfer pastry cream filling to a large pastry bag fitted with a 1/4-inch plain tip. Insert the tip into the hole in the bottom of each cream puff and barely fill each puff (do not overfill). Set filled puffs aside.
2. Using tape, cover styrofoam cone with parchment paper. Double tape to secure the bottom of cone to a serving platter.
3. Line a tray with wax paper. Working with 1 filled cream puff at a time, dip bottom in chocolate sauce, leaving top 1/3 inch uncoated and letting excess drip off. Set aside on wax paper.
4. Once cream puffs are dipped, arrange 1 ring of puffs around base of cone, placing as closely together as possible and inserting a toothpick through each puff into cone, so as to attach puff to cone. Push toothpick as far into cone as possible.
5. Attach second ring of puffs above first, again packing tightly and staggering so puffs in second ring are not directly above puffs in first ring. Continue in same manner to attach remaining puffs. Finish covering cone with 1 puff attached to the top of cone.
6. Decorate by pushing cranberries, M&Ms, red hots or dragées into the gaps and spaces between the cream puffs.
7. To serve croquembouche, dismantle, 1 puff at a time and enjoy!
Posted by
Karlie Kiser
Labels:
Chocolate
,
Decorating Techniques
,
Desserts
,
French
,
Holiday Baking
,
Pastry
January 18, 2011
Hawaiian Adventures Part 2: The Big Island
It's cold outside. The sky is gray, the air frigid and the sun just won't show its face. With no relief in sight, at least not for several months, what's one to do? Perhaps the more affluential can hop a plane to Jamaica or Barbados, soaking up the sun to escape winter's grasp. For the rest of us however, reminiscing on vacations past is the only way to vicariously travel to the equator. While dwelling on such a thought, it occurred to me that I never shared the second leg of my Hawaiian adventure. It seems that now would be as good a time as ever and hopefully my tale will provide a few of you with your necessary getaway.

I believe I made it clear that the week I spent in Maui was pure bliss. Food, sun, beaches and a little adventure. It was the perfect vacation. If you can believe it, I actually managed to experience a completely different type of vacation on the Big Island of Hawaii. It was all social camaraderie, lot's of adventure and even a little romance (which, unfortunately, is a part of the story I must decline to share). Upon arriving in Kona, I was immediately introduced to Abe's local friends. (Abe was my gracious host and a friend I've known and cherished since I was 17). They were all around my age and from different backgrounds and places. Each had their own story on how they came to arrive in Kona from California, Seattle, Virginia or even Kentucky. They all embraced me and showed me what it was like to live with the "Aloha Spirit."

During my visit, Abe was busy studying for the GMAT, so I was pawned off to different friends that were given the burden of showing me around for the day (although I don't think any of them really minded all that much). The first day I joined two of his buddies for one of their (almost) daily snorkels. Until this day, snorkeling had not been one of my favorite pastimes. I'm not the biggest fan of swallowing salt water. However, this particular time snorkeling will long exist as one of the most memorable experiences I've ever had. After timidly wading into the water, I became increasingly comfortable with the crystal clear sea. I was enjoying myself while paddling through the warm water, gazing down at the ocean floor, comprised of endless miniature valleys of sand. Without notice, I was suddenly in deep water, the earth's surface a good 70 feet below me. The panic slowly started to rise like a lump of coal in my throat, but just as quickly as it appeared, it vanished. For the next thing I knew, I was swimming among dolphins. Nearly 30 of them, in all directions. To my left, to my right, above and below me. There were big mama dolphins gliding through the water next to their babies, guiding them with their fins. It seemed as if some of them were playing with their children, tickling them even. For ten minutes these dolphins let me into their world and allowed me to observe them. It was the single most awe inspiring moment of my life, even if I was digesting marine mammal feces (it was unavoidable; it was floating everywhere). However, fish poop is a small price to pay for a majestic moment such as this.
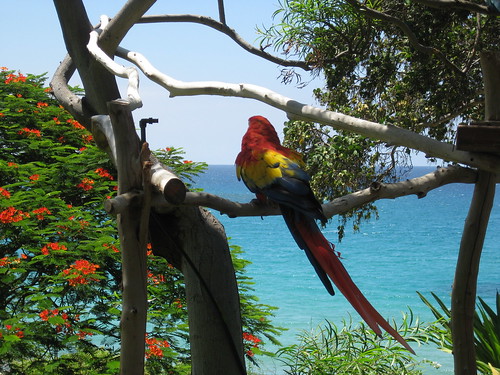
It seemed my vacation in Kona had peaked on the very first day. Wrong again. After some much needed relaxation on various beaches, a booze soaked day at the Mauna Kea resort, followed by indulgent gluttony at Merriman's cafe (menu: mango margaritas, margherita pizza, caponata bruschetta, hummus, truffled mac and cheese, meatball subs, and the most divine Hamakua- local Hawaiian mushrooms- tagliatella. All of which was followed by chocolate soufflés from Roy's. Oh yeah, this was all for 4 people), we packed up the car and headed for a weekend of camping on the other side of the island in Hilo.
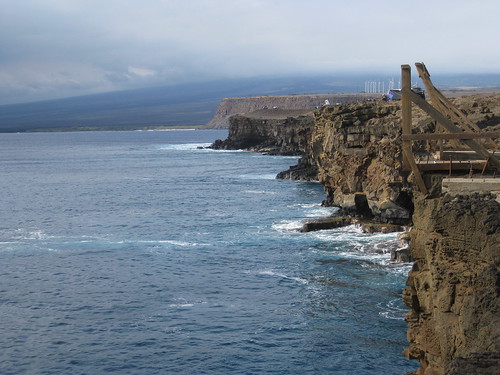
With a caravan of adventurous Hawaiian souls (I was now one of them), we stopped at Ka Lae or South Point, the southern most tip of the Big Island and the Unites States, to jump off the cliffs. Easily a 60-foot drop, I was hesitant to make the leap, but how could I refuse such an opportunity? It was exhilarating plunging into the dark blue water with nothing but miles and miles of ocean in front of you. Only after you look up from the water, while climbing a very rickety, seemingly ancient ladder to the top of the cliff do you realize how far down the drop really is.
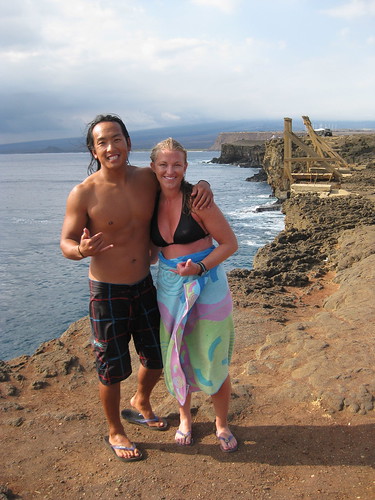
After a couple more stops along the way to Hilo, we arrived and set up camp mere meters from the ocean's edge. We (illegally) hiked toward natural steam caves, lost our way to the hot ponds, picked up the occasional patchouli drenched hitch hiker ("we're going wherever the wind takes us, man"), and gazed at the stars while listening to waves crash on the beach. Never a fan of sleeping outdoors, but I could live like this forever.
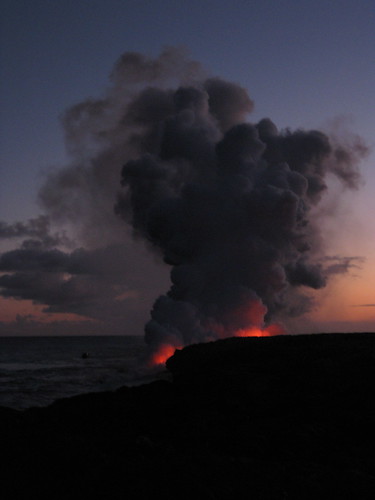
Guess what? It gets even better. The second day in Hilo was reserved for a 6 mile hike to the lava flow. We could see the billowing pinkish-gray smoke from a distance on our drive in, but I was eager to see real live lava up close and personal (or as close as one can get to molten magma). The lava flow on the Big Island is constant, more visible at certain times than others, as it makes its way through a tube beneath the surface and sparks and spills into the ocean.

The land that we were traversing toward the eruption was actually new land formed from former eruptions. The hardened rock beneath our feet was black and shiny, smelled of sulfur and became increasingly warm as we neared the cascading lava. Once we hiked as far as we could, without singeing our eyebrows, we looked for small lava fissures to roast marshmallows. Though a very cool and rare way to make s'mores, it doesn't make for the best tasting treat, that is unless you enjoy the crunch of lava rock between your teeth and the faint aftertaste of sulfur which induces a slight panic of being poisoned.
My trip was coming to an end, but there were still so many things I had yet to cross off my list. I mean I had been in Hawaii for 14 days and still had not tried my hand at surfing. What was a girl to do? I called the airline and inquired on the cost of changing my flight. Far too expensive. But according to my new Hawaiian friend, by way of Seattle (a seasoned traveler who has been to every exotic local one could think of), the easiest way to reschedule a flight was to "miss" that flight and plea (with girlish charms and perhaps some teary sniffles thrown into the mix) for a seat on the next flight out. Well, as luck would have it, the next available flight was three days later. Shucks.

So I was granted three extra days in paradise, 2 of which I would spend "surfing." Yes, the quotation marks are essential as I'm not sure you could qualify what I did as surfing. Abe did tell me I did quite well for my first time out (I rode a wave for about a split second at one point), but I still believe he was just being nice. However, in my defense, I was taken out to one of the hardest spots to learn surfing. A beach that was spotted with black rocks just waiting to tear the flesh off one's foot. I gave it my all for about 30 minutes but then resigned to the notion that I would never be a "hot surfer babe." I decided to instead sun bathe and watch others surf while pretending to take notes.

The last day and final thrill of my Hawaiian adventure had finally arrived, but this excursion began at 5 am (after a heavy night of drinking and singing karaoke- and please note I never sing karaoke, so my rendition of Madonna's "Like a Virgin" should serve as an indicator of how much drinking was actually involved) on a chartered fishing boat. Abe, Jesse (the seasoned traveler), her Australian friend Kristofer, myself and the captain ventured out onto the open seas. Just as I finished my egg McMuffin, breathed in the salty air and set my gaze on the glassy water's surface, the nausea hit me like a rock. It was hard to tell at this point whether it was sea sickness, the whiskey I had consumed only mere hours before or perhaps even the egg mcMuffin (I hate those things but they're hard to turn down in the event of a hangover). Whatever it was, it took hold of me in fierce fashion and wouldn't release its talons for a good 5 hours.
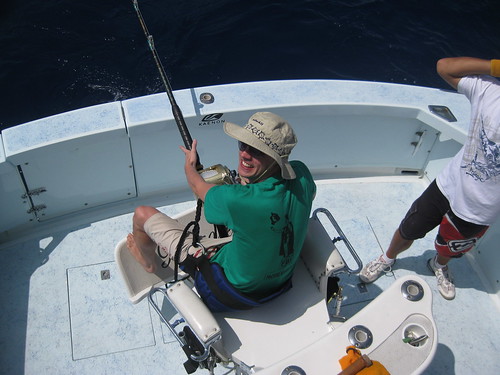
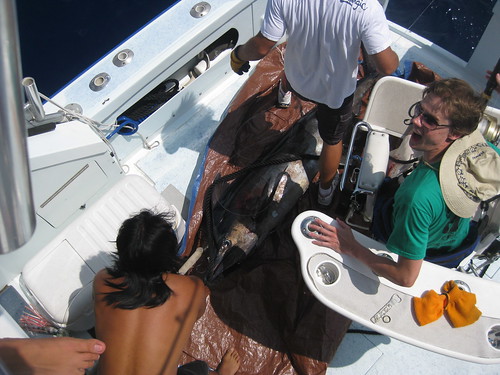
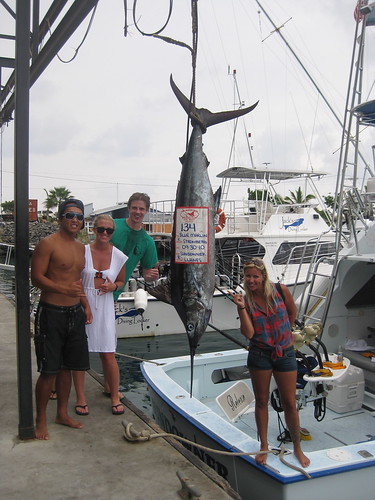
Luckily, fishing is a waiting game and just as the fog of nausea started to lift, the line pulled tight. Kristofer, who had been in bad shape as well, vomiting at least twice more than I, jumped to the fighting chair and battled with the mighty fish at the end of the line. All thoughts of nausea disappeared as the excitement escalated with the sudden and methodical actions of the crew. Kristofer continued to reel in the fish (which had now been identified as a blue marlin since his great leap from the surface), sweat emerging from his pores, hands cramping with strain, but a wide grin remaining glued to his face.
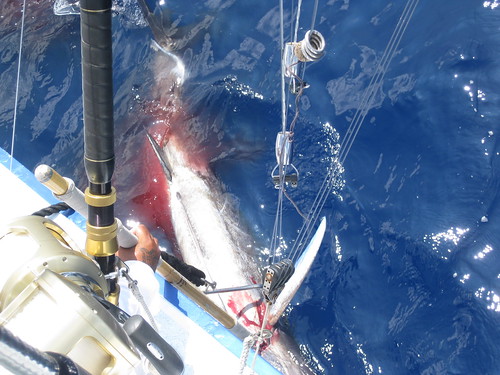
As the marlin reached the edge of the boat, the crew took over. The great fish thrashed about, struggling to free itself from the hook. The captain took a club to its head, an action I deemed cruel but was argued as necessary by all others. The marlin was hauled on board and wrapped in tarp as we made our way back to shore. We took the trophy to be weighed and photographed and our day out at sea was declared a victory, nausea and vomiting included.
I took my sea legs to shore, packed my bags and bid farewell to my new kindred spirits. My Hawaiian adventure may have been over, but the memories and friendships I forged will last forever.
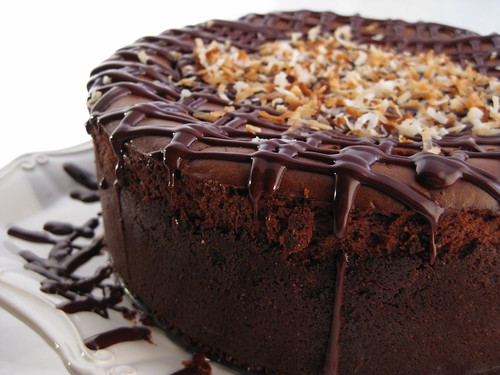
Hula pie is a sweet staple among the chain of the Hawaiian islands. A wide variety of versions exist, but all include these essential ingredients: chocolate, coconut, coffee, and macadamia nuts. I, of course, was working on my own adaptation all the while traveling, sight seeing and tanning. I came home and put my mental creation to the test, serving it to a deserving and knowledgeable audience: my grandparents who had come over from Maui to stay with us during the holidays. Ganny said it was perfection, but that sort of praise is expected from a grandmother. However, I think my Hula Cheesecake was just about as good as any hula pie I ate while vacationing in paradise.
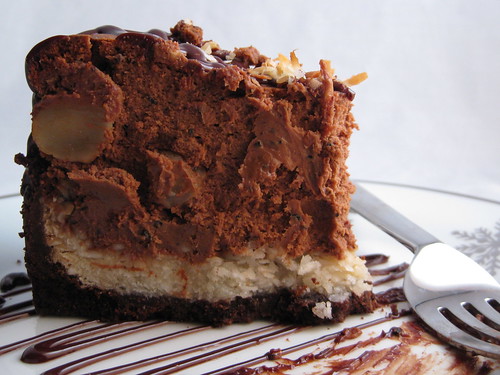
Recipe by Karlie Kiser
Ingredients:
Crust:
9 oz chocolate wafers
2 tbsp sugar
4 oz semisweet chocolate, chopped
1 stick unsalted butter, melted
pinch of salt
Macaroon layer:
3/4 cup evaporated cane juice (super fine sugar can be substituted)
2 1/2 cups unsweetened shredded coconut (available at Whole Foods)
2 egg whites
1/2 tsp almond extract
1/2 tsp vanilla extract
pinch of sea salt
Cheesecake filling:
8 oz bittersweet chocolate, chopped
32 oz cream cheese, at room temperature
1 1/4 cups sugar
1 tbsp flour
1/4 cup Kahlua (or other coffee liqueur)
2 tbsp espresso powder
2 tbsp ground coffee (use a Kona blend if possible)
1 1/2 tbsp coconut extract
1 tsp vanilla extract
4 eggs
3/4 cup coarsely chopped macadamia nuts
Glaze:
1/2 cup plus 2 tbsp heavy cream
5 oz bittersweet chocolate, chopped
1/4 cup sweetened coconut, toasted
Directions:
1. Preheat oven to 350º F. Spray the bottom and sides of a 9-inch springform pan with nonstick spray. Line with a round of parchment paper if so desired.
2. For the crust, finely grind chocolate wafers and 2 tablespoons sugar together in a food processor. Add semisweet chocolate and pulse until chocolate is efficiently chopped and combined. Add melted butter and salt and pulse until mixture comes together. Press crumb mixture onto bottom and half way up sides of the prepared springform pan. Set aside.
3. For the macaroon layer, mix evaporated can juice, coconut, egg whites, almond and vanilla extracts and sea salt together in a small bowl with your hands (get messy- cooking is hands on!). Press mixture onto top of chocolate crust (don't go up the sides). You can use all the macaroon mixture or reserve some for other use, make this layer as thick as you like. Bake in preheated oven for 8 minutes.
4. Melt 8 ounces bittersweet chocolate in a double boiler or bain marie over simmering water. Stir until smooth and melted. Set aside to cool slightly.
5. For the cheesecake filling, beat cream cheese and sugar together with an electric mixer (or stand mixer fitted with paddle attachment) until smooth and blended. Beat in 1 tablespoon flour.
6. In a small bowl, stir Kahlua, espresso powder, ground coffee and coconut and vanilla extracts together until espresso powder dissolves. Beat into cream cheese mixture until combined, scraping down the sides as necessary.
7. Add eggs 1 at a time, beating after each addition until just combined.
8. Slowly stir in the melted chocolate, beating at low speed until fully combined. Fold in the macadamia nuts.
9. Pour cheesecake filling into crust and place on a baking sheet. Bake until top is puffed and center 2-inches move only slightly when pan is gently shaken, about 1 hour (or more depending on your oven).
10. Let cool at room temperature, then chill in fridge for at least 4 hours.
11. For the glaze, warm heavy cream in a bowl set over a pan of simmering water, about 2 minutes. Add the 5 oz bittersweet chocolate, let sit for 1 minute, then stir until melted and smooth. Remove from heat and let cool only slightly, about 5 minutes. Drizzle ganache glaze over chilled cheesecake in any manner you like. I like to pour the ganache into a large squeeze bottle. I find this to be the easiest way to control the direction of the drizzle. Before the glaze sets, top the center of the cheesecake with toasted coconut. Slice, serve and enjoy!
Serves at least 12
December 23, 2009
12 Days of Goodies- Day 11: Banana Bread Pudding
As much as I try to venture out and try new things, until today, I had yet to ever put a spoonful of bread pudding in my mouth. My mom is not a fan of bread pudding, which I guess could explain why I had never eaten it. All my life, the mere mention of the words bread pudding, put a frown on my mother's face. Naturally, I felt compelled to change her mind. Perhaps convert her to a bread pudding lover or connoisseur of sorts. But realistically speaking, I'd be happy if I could get her to take just one bite, and nod with the slightest bit of approval. That was the goal in mind.
I absolutely love banana bread , so I figured bread pudding based off this childhood favorite of mine, could only increase my chances for winning over my mom. I also added a good helping of chocolate chips, because there are few things that contain chocolate that my mom doesn't like. I can't say I necessarily succeeded in my mission; bread pudding will always be one of those things my mom would rather not eat (kind of like my aversion to scallops). But at least I can now say I've tried bread pudding, and I guess all that matters, is that I liked it.
Banana Bread Pudding
Recipe adapted from The Dallas Morning News
Ingredients:
6 cups soft French bread cubes, loosely packed
4 tablespoons butter, melted
2 cups heavy cream
1 cup milk (preferably 2% or whole milk)
5 egg yolks
2/3 cup sugar
1 teaspoon vanilla extract
1/2 teaspoon ground cinnamon
1/8 teaspoon nutmeg
2 cups mashed ripe banana
1 tablespoon fresh lemon juice
1 cup semi-sweet chocolate chips
Directions:
1. Lightly grease a 9x13 inch glass baking dish with butter.
2. Cut the bread into bite-size cubes (do not use the crust if it is tough) and place in the prepared dish
3. Drizzle the melted butter over the bread cubes, tossing the cubes while drizzling butter. Stir and toss the cubes to distribute the butter as evenly as possible. Set aside.
4. Pour the cream and milk into a small saucepan and bring it just to a boil over medium heat. Meanwhile, place the egg yolks in a small mixing bowl and beat lightly with whisk. When the cream mixture boils, remove from heat and allow to cool slightly. Whisk in the egg yolks, sugar, vanilla, cinnamon, and nutmeg. Pour mixture over the bread cubes. Cover the dish with foil and refrigerate at least one hour (and up to four hours) so the bread can absorb the milk mixture.
5. Preheat the oven to 325º F. Remove the bread pudding from the refrigerator and uncover. Combine the bananas, lemon juice, and chocolate chips in a small bowl. Stir the banana mixture into the bread pudding and smooth the top with a spatula. Re-cover the dish and cut six small holes in the foil so steam can escape. Bake, covered with foil, until set, about 50 minutes to one hour.
6. Remove the bread pudding from the oven and cool 15 to 20 minutes. Serve warm in dessert bowls with caramel or fudge and ice cream, if desired.
Makes 12 servings
1. Lightly grease a 9x13 inch glass baking dish with butter.
2. Cut the bread into bite-size cubes (do not use the crust if it is tough) and place in the prepared dish
3. Drizzle the melted butter over the bread cubes, tossing the cubes while drizzling butter. Stir and toss the cubes to distribute the butter as evenly as possible. Set aside.
4. Pour the cream and milk into a small saucepan and bring it just to a boil over medium heat. Meanwhile, place the egg yolks in a small mixing bowl and beat lightly with whisk. When the cream mixture boils, remove from heat and allow to cool slightly. Whisk in the egg yolks, sugar, vanilla, cinnamon, and nutmeg. Pour mixture over the bread cubes. Cover the dish with foil and refrigerate at least one hour (and up to four hours) so the bread can absorb the milk mixture.
5. Preheat the oven to 325º F. Remove the bread pudding from the refrigerator and uncover. Combine the bananas, lemon juice, and chocolate chips in a small bowl. Stir the banana mixture into the bread pudding and smooth the top with a spatula. Re-cover the dish and cut six small holes in the foil so steam can escape. Bake, covered with foil, until set, about 50 minutes to one hour.
6. Remove the bread pudding from the oven and cool 15 to 20 minutes. Serve warm in dessert bowls with caramel or fudge and ice cream, if desired.
Makes 12 servings
December 19, 2009
12 Days of Goodies- Day 7: Pistachio, Cherry, and White Chocolate Biscotti
I've aways liked the idea of dipping a crisp, sweet piece of biscotti in my coffee... perhaps as I'm sitting in a café... reading a good book... listening to French music. Ok, so that's kind of a cliché, but that's the image that comes to mind when I think of biscotti. (That does sound like a great way to while away the hours though, huh?)
The best thing about doing this 12 days series, is that I've been able to make so many things that I've always wanted to. And believe it or not, biscotti has always been high on that list. And the great thing about biscotti, is that there is really no limit as to what you can do with it. You could make almond and lemon biscotti, chocolate hazelnut biscotti, vanilla and honey biscotti, even a savory biscotti! Well, I chose this pistachio, cherry, and white chocolate biscotti, because I liked the colorful cross section of it. And technically, the recipe called for dried raspberries, but I was unable to find any. So I went with cherries. Actually what I found was razzcherries (?) I'm guessing that has to be somewhat related to raspberries, right?
Pistachio, Cherry, and White Chocolate Biscotti
Recipe courtesy of Epicurious.com
Ingredients:
3 cups all purpose flour
2 teaspoons baking powder
1/2 teaspoon salt
1 cup sugar
3 large eggs
2 tablespoons canola oil
2 1/2 teaspoons almond extract
3/4 cup shelled raw unsalted natural pistachios
1 cup dried raspberries or chopped dried strawberries (about 5 ounces) (I used dried cherries)
1/2 cup chopped high-quality white chocolate (such as Lindt or Perugina)
8 ounces high-quality white chocolate and/or 8 ounces bittersweet or semisweet chocolate, chopped
Directions:
1. Preheat oven to 350°F. Line large baking sheet with parchment paper. Whisk flour, baking powder, and salt in medium bowl to blend. Using electric mixer, beat sugar, eggs, oil, and almond extract in large bowl until well blended. Add flour mixture and beat until combined (the batter should be very stiff). Stir in pistachios, dried berries, and 1/2 cup chopped white chocolate. Drop dough by heaping tablespoonfuls in two 12-inch-long strips on prepared baking sheet, spacing strips 3 inches apart. Using wet fingertips, shape each strip into 3-inch-wide log, pressing evenly (logs may look slightly lumpy).
2. Bake logs until lightly browned and almost firm to touch, about 30 minutes. Cool logs on sheet 30 minutes. Reduce oven temperature to 325°F.
3. Carefully transfer logs to cutting board. Line same baking sheet with parchment paper. Cut each log crosswise into generous 1/2-inch-thick slices. Stand biscotti upright, spacing about 1/4 inch apart, in 3 rows on prepared baking sheet. Bake until pale golden (biscotti may be soft but will firm as they cool), about 20 minutes. Cool completely on baking sheet.
4. Line another large baking sheet with parchment paper. Place 8 ounces chopped white chocolate in medium glass bowl. Place 8 ounces chopped bittersweet chocolate in another medium glass bowl, if desired. Microwave separately on medium in 20-second intervals just until chocolate is soft to touch, about 40 seconds total (do not overheat or chocolate will burn or seize). Stir chocolate until smooth.
5. Dip 1 end or 1 side of each biscotti in chocolate; place on baking sheet. Chill until chocolate is set, about 30 minutes. (Can be made ahead. Arrange in single layer in airtight container and chill up to 5 days or freeze up to 2 weeks.)
Makes about 3 dozen
Posted by
Karlie Kiser
Labels:
Breakfast
,
Chocolate
,
Desserts
,
Fruit
,
Holiday Baking
,
Italian
,
Nuts
December 16, 2009
12 Days of Goodies- Day 4: Chocolate Ganache Truffles
As much as I love sweets and trying new and different baked treats, I always come back to the tried and true chocolate. Sometimes, when that hankering for something sweet kicks in, nothing can hit the spot like a good piece of dark chocolate. And I don't particularly mind what vessel that dark chocolate comes in, be it a liquid, a bar, or candy coated. But there is something slightly better than pure dark chocolate. Chocolate mixed with heavy cream, thus creating one of the most heavenly things on earth... ganache. The word alone drips with decadence. So when I went in search of that perfect bite of chocolate, I immediately turned to Ina Garten. Of course, not to my surprise, I was able to find a recipe for chocolate truffles that seemed as easy as they did delicious. I am usually game for a challenge in the kitchen, but when you sign up to bake something 12 days in a row, taking the easy road every now and then only seems sane. But come to think of it, simplicity and chocolate really go hand in hand. Chocolate is often best enjoyed in its natural state, without all the fuss.
Chocolate Ganache Truffles
Recipes (slightly) adapted from Ina Garten, courtesy of Food Network
1/2 pound good bittersweet chocolate (I used Ghiradelli)
1/2 pound good semisweet chocolate (I used Ghiradelli)
1 cup heavy cream
2 tablespoons orange flavored liqueur, optional (recommended: Grand Marnier)
1 tablespoon prepared coffee
1/2 teaspoon good vanilla extract
confectioners’ sugar
sweetened cocoa powder
Other optional coatings:
toasted coconut
toasted, chopped almonds, peanuts, or hazelnuts
chopped toffee bits
Directions:
1. Chop the chocolates finely with a sharp knife, or in a food processor. Place in a heat-proof mixing bowl.
2. Heat the cream in a small saucepan until it just boils. Turn off the heat and allow the cream to sit for 20 seconds. Pour the cream through a fine-meshed sieve into the bowl with chocolate. With a wire whisk, slowly stir the cream and chocolates together until the chocolate is completely melted. Whisk in the orange flavored liqueur, if using, coffee, and vanilla. Cover and chill in the fridge for at least 1 hour.
3. Mix about 1/3 cup confectioner's sugar with 3/4 cup sweetened cocoa powder in a shallow dish. With a melon baller or small cookie dough scoop, spoon round balls of the chocolate mixture onto a baking sheet lined with parchment paper. Roll each ball of chocolate in your hands to make it round. Roll in the confectioners’ sugar-cocoa powder mix, or try one (or all!) of the other optional coatings. Store rolled truffles in an airtight container and they will keep for weeks in the refrigerator, but serve them at room temperature.
Makes bout 35-40 truffles
1. Chop the chocolates finely with a sharp knife, or in a food processor. Place in a heat-proof mixing bowl.
2. Heat the cream in a small saucepan until it just boils. Turn off the heat and allow the cream to sit for 20 seconds. Pour the cream through a fine-meshed sieve into the bowl with chocolate. With a wire whisk, slowly stir the cream and chocolates together until the chocolate is completely melted. Whisk in the orange flavored liqueur, if using, coffee, and vanilla. Cover and chill in the fridge for at least 1 hour.
3. Mix about 1/3 cup confectioner's sugar with 3/4 cup sweetened cocoa powder in a shallow dish. With a melon baller or small cookie dough scoop, spoon round balls of the chocolate mixture onto a baking sheet lined with parchment paper. Roll each ball of chocolate in your hands to make it round. Roll in the confectioners’ sugar-cocoa powder mix, or try one (or all!) of the other optional coatings. Store rolled truffles in an airtight container and they will keep for weeks in the refrigerator, but serve them at room temperature.
Makes bout 35-40 truffles
December 14, 2009
12 Days of Goodies- Day 2: Bizcochitos
So on to day two, and feeling a wee bit more rested than I was from day one! Which is a good thing since I have 10 more days to go and many more things to accomplish this holiday season. Nevertheless, I love the holidays. The general spirit in the air, the gift giving (and receiving...), and how this time of year makes for an excellent excuse to bake and eat an obscene amount of sweets. I religiously flip through and browse food magazines and websites, and thus have accumulated quite a large stack of recipes I eventually want to try. Sometimes those recipes are added to the bottom of the pile, only to slowly work their way up, but other times, a special recipe might grab my attention and get ushered straight to the top.
This recipe for bizcochitos (pronounced bees-ko-CHEE-toh) did just that. The story behind these little cookies and the flavors they promised were too intriguing to put off until later. It seemed fitting for the occasion too since it is usually served on special occasions such as Christmas. The bizcochito is of Spanish origin and was named the official state cookie of New Mexico about 20 years ago. The ingredients are equally as interesting: anise, sherry, cinnamon-sugar served along side a dipping sauce of chocolate, coffee, and cayenne. The results were as expected; they were delicious, of course, but the bizcochito was also light, crisp, and completely complex. Each bite kept my taste buds guessing and yearning for just one more cookie, dipped in a rich, and equally as complex chocolate sauce.
Bizcochitos with Mexican Chocolate Dipping Sauce
Recipe Courtesy of Cuisine At Home
Ingredients:
3 cups all-purpose flour
1 tsp baking powder
1/2 tsp salt
2/3 cup vegetable shortening
6 tablespoons unsalted butter
3/4 cup sugar
1 egg
2 tablespoons dry sherry
2 tsp anise extract
2 tablespoons anise seed
For the coating:
1/4 cup sugar
1 tsp ground cinnamon
Directions:
1. Whisk together the flour, baking powder, and salt; set aside.
2. Using a hand mixer on medium speed, cream shortening, butter, and sugar together until mixture is light and fluffy, about 5 minutes. Scrape down sides of the bowl. Beat egg, sherry, and anise extract into shortening mixture. Add anise seed and half of the flour mixture; beat on low speed until ingredients are blended. Beat in remaining flour mixture until dough pulls away from the sides of the bowl.
3. Divide dough in half. Shape each half into a disk; wrap in plastic. Chill dough at least 2 hours before rolling out. (Dough may be frozen up to one month; thaw overnight in the refrigerator before rolling out.)
4. Preheat oven to 350º F. Coat baking sheets with nonstick spray.
5. On a well-floured work surface, roll out dough to a thickness of about 1/8 inch. Shape cookies using a metal ruler, and cut the dough into parallel 1-inch strips, then again at an angle to form diamonds. Transfer cookies to the prepared baking sheets using an offset spatula.
6. Bake cookies until set and lightly golden brown around the edges, 15-18 minutes. Let cookies cool on the baking sheet for 5 minutes.
7. Meanwhile, mix sugar and cinnamon in a bowl. Gently coat warm cookies in sugar mixture, then transfer cookies to a rack to finish cooling. Serve cookies with Mexican Chocolate Dipping Sauce (see below).
Makes about 100 two-inch cookies
Mexican Chocolate Dipping Sauce
Ingredients:
1 cup semisweet chocolate chips
2/3 cup heavy cream
2 tablespoons coffee liqueur
2 tsp ground cinnamon
pinch cayenne pepper
Directions:
1. Place all ingredients in a microwave safe bowl. Heat in the microwave for about two minutes. Whisk mixture until smooth.
1/4 cup sugar
1 tsp ground cinnamon
Directions:
1. Whisk together the flour, baking powder, and salt; set aside.
2. Using a hand mixer on medium speed, cream shortening, butter, and sugar together until mixture is light and fluffy, about 5 minutes. Scrape down sides of the bowl. Beat egg, sherry, and anise extract into shortening mixture. Add anise seed and half of the flour mixture; beat on low speed until ingredients are blended. Beat in remaining flour mixture until dough pulls away from the sides of the bowl.
3. Divide dough in half. Shape each half into a disk; wrap in plastic. Chill dough at least 2 hours before rolling out. (Dough may be frozen up to one month; thaw overnight in the refrigerator before rolling out.)
4. Preheat oven to 350º F. Coat baking sheets with nonstick spray.
5. On a well-floured work surface, roll out dough to a thickness of about 1/8 inch. Shape cookies using a metal ruler, and cut the dough into parallel 1-inch strips, then again at an angle to form diamonds. Transfer cookies to the prepared baking sheets using an offset spatula.
6. Bake cookies until set and lightly golden brown around the edges, 15-18 minutes. Let cookies cool on the baking sheet for 5 minutes.
7. Meanwhile, mix sugar and cinnamon in a bowl. Gently coat warm cookies in sugar mixture, then transfer cookies to a rack to finish cooling. Serve cookies with Mexican Chocolate Dipping Sauce (see below).
Makes about 100 two-inch cookies
Mexican Chocolate Dipping Sauce
Ingredients:
1 cup semisweet chocolate chips
2/3 cup heavy cream
2 tablespoons coffee liqueur
2 tsp ground cinnamon
pinch cayenne pepper
Directions:
1. Place all ingredients in a microwave safe bowl. Heat in the microwave for about two minutes. Whisk mixture until smooth.
November 21, 2009
Braised Short Ribs with Chocolate-Rosemary Sauce
I know what you're thinking after reading the title of this latest experiment of mine, but trust me, don't judge this recipe by its name. Sweet it is not. Instead, the chocolate and cocoa powder lend depth and a complexity to the sauce that would otherwise be flat and mundane.
I've been dying to braise some short ribs for quite some time now. Because truth be told, I've never actually braised anything- ever. I've never had the right equipment for it. For my 25th (sigh...) birthday I celebrated last week, however, I finally got the Le Creuset dutch oven I've had my eye on for ages. That's when I set off in search of the perfect braising recipe to christen my new ceramic friend. I searched far and wide through many a foodie website and saw many of the usual suspects: beef braised in wine, chicken braised in wine, lamb braised in, you guessed it, wine. So when I ran across this recipe for braised beef short ribs with a chocolate-rosemary sauce, I pretty much stopped dead in my tracks. I think it had something to do with that word chocolate... but more than that, I was intrigued by the flavor combinations promised in the recipe's title: beef, chocolate, and rosemary- such 3 distinct flavor profiles. I just had to know what the outcome would be.
As I said earlier, this dish is not in the least bit sweet. It is most definitely a savory entrée. Some of you may already know that chocolate is the secret ingredient in a mole sauce. A sauce that is also savory and not sweet. The chocolate in this particular recipe is added at the end, after the beef has been slowly tenderizing in a hot oven. It helps to thicken the sauce, providing a much more pleasant mouthfeel and the rosemary gave it just a hint of earthiness. And have I mentioned how mouth watering-ly tender the ribs were? Fall off the bones tender! And oh so juicy. A braised beef recipe worth waiting the three plus hours necessary to acquire that certain degree of tasty tenderness.
Braised Short Ribs with Chocolate-Rosemary Sauce
Recipe Adapted from Epicurious.com
Ingredients:
1/4 cup diced bacon (or pancetta if you're feeling fancy)
6 pounds bone-in short ribs
1 1/2 cups finely chopped onions
1/4 cup finely chopped shallots
1/4 cup finely chopped celery
1/3 cup finely chopped peeled carrots
3 garlic cloves, minced
2 cups dry red wine
3 cups low sodium chicken broth
2 cups chopped drained canned diced tomatoes
2 tablespoons chopped fresh parsley
1 very large fresh thyme sprig
1 bay leaf
3 tablespoons shaved or grated bittersweet chocolate
2 tablespoons unsweetened cocoa powder
1 teaspoon finely chopped fresh rosemary
Directions:
1. Preheat the oven to 350º F.
2. Heat a large dutch oven over medium heat. Add bacon and sauté until crisp. Using a slotted spoon, transfer bacon to paper towels to drain.
3. Sprinkle ribs with salt and pepper. Working in batches, brown ribs in drippings in pot over medium-high heat until brown on all sides, about 8 minutes per batch. Transfer to a plate.
4. Add onions and next 4 ingredients to pot. Cover, reduce heat to medium, and cook until vegetables are soft, stirring occasionally, about 10 minutes. Add wine. Boil uncovered until liquid is reduced by half, scraping up brown bits, about 5 minutes. Add broth, tomatoes, parsley, thyme, bay leaf, and reserved bacon. Return ribs to pot, cover, and transfer to the oven. Braise for approximately 3 hours or until the meat is tender.
5. Remove pot from the oven and transfer ribs to plate; discard bay leaf and thyme. Spoon fat from surface of sauce. Boil sauce until beginning to thicken, about 10 minutes. Reduce heat to medium. Add chocolate, cocoa powder, and rosemary; stir until chocolate melts. Season to taste with salt and pepper. Return ribs to pot. Simmer to rewarm, about 5 minutes.
Makes 6-8 servings
November 10, 2009
Triple Chocolate Chip Pie
I think it's safe to say that almost everyone has a favorite dish or dessert that they grew up eating. The ones that mom would make without the help of a recipe and where the simple mention of its name conjures up bittersweet and nostalgic childhood memories. When selecting recipes I want to prepare for the week, I most often choose ones that involve a flavor combination or technique I have yet to attempt. However, this week was different. I felt myself constantly drawn to make an old childhood favorite. Perhaps it's partly due to the fact that I recently just moved back into my old room, high school memorabilia still intact, or maybe it's because the holidays are right around the corner, a time of year that always has me wishing to be a kid again.
There are two desserts that come to mind when I think of growing up: no-bake cookies and chocolate chip pie, both of which my mom has been making for years, and both of which are extremely easy to make (which, if you know my mom, should come as no surprise- spending hours in the kitchen is not something she is too keen on). I decided to make the latter of the two desserts, the chocolate chip pie. It's rich, decadent, and oh so chocolaty. However, my usual urge to try something new resurfaced quickly and I felt compelled to give this long time favorite of mine an updated and more sophisticated makeover.
As with most chocolate loaded confections, the sweetness of it all can start to get to you, leaving you with that pang in the pit of your stomach (usually consisting of equal parts guilt and just good ol' fashioned stomach ache due to sugar overload). I wanted to cut the sweetness, while retaining the generous (but necessary) amount of chocolate in this pie. I decided to use three different variations of chocolate: semi-sweet, bitter-sweet (60% cacao), and dark chocolate. I also substituted half the amount of the original recipe's pecans, for chopped hazelnuts, which lent a really nice flavor to the end result of the pie. I will say though- confession time- that I originally had every intention of making a pie crust from scratch, but I succumbed to the super market standard of convenience: Pillsbury refrigerated pie dough. I usually prefer to make things from scratch, but I'm still unpacking and have found myself strapped for time as of late. Anyways, the great thing about this pie is that it would be easy to make your own. Perhaps experiment with different types of nuts or substitute part of the chocolate for butterscotch chips. Or possibly, if you're one who enjoys that slightly sick feeling after indulging in too much chocolate, you could always add, well, more chocolate.
Triple Chocolate Chip Pie
1 refrigerated pie crust (or make your own)
2 large eggs
1/2 cup granulated sugar
1/2 cup brown sugar
1 stick unsalted butter, melted
1/2 cup all-purpose flour
pinch of salt
1/3 cup semi-sweet chocolate chips
1/3 cup bittersweet chocolate chips (I used 60% cacao)
1/3 cup dark chocolate chips
1/2 cup sweetened shredded coconut
1/2 cup chopped pecans
1/2 cup chopped hazelnuts, skinned and toasted (see note below)
1/3 cup toffee bits
Directions:
1. Preheat the oven to 350 degrees F.
2. In a medium sized mixing bowl, beat together the eggs, sugars. butter, flour, and salt. Fold in the chocolate, coconut, pecans, and hazelnuts.
3. Place the chilled pie crust in a standard pie dish, crimping the edges if desired. Pour the chocolate mixture into the pie crust and spread evenly. Sprinkle with the toffee bits.
4. Bake for 30 to 35 minutes or until golden brown. Let the pie rest for 30 minutes before serving.
Serves 8
Note: To toast hazelnuts, heat the oven to 350 degrees F. Spread the hazelnuts on a baking sheet and bake for 15 minutes or until lightly browned and the skins begin to flake. Remove from the oven and place nuts in a dish towel. Roll up the towel and let the nuts "steam" for 5 minutes and then briskly rub the towel (with nuts inside) to remove the skins from the nuts. Cool and then chop coarsely.
To view other hazelnut recipes, click on the image below!
Subscribe to:
Posts
(
Atom
)