Showing posts with label Pastry. Show all posts

July 12, 2012

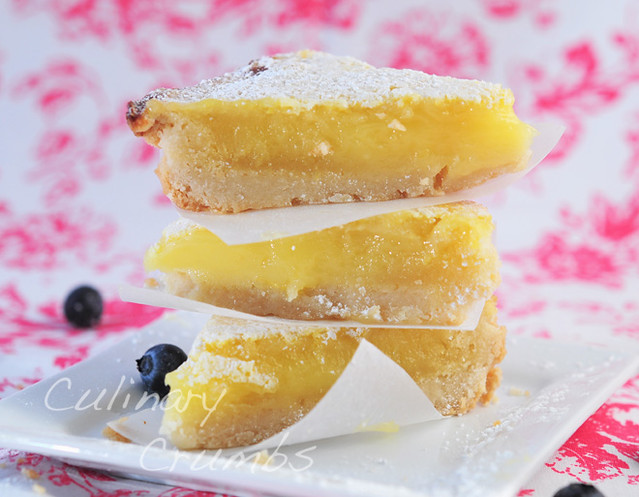
Lemon Bars


silky, lucious lemon bars

I’m still trying to figure out if I’m more of a sweet tooth or salty fan. You would think I’d have that figured out by now. The thing is I’m pretty sure I like both equally. There are times when I down right crave a bag of salt & vinegar chips. Then again, there are also days when nothing else will do but a heaping scoop of Bluebell Banana Split Ice Cream. (Have you had this flavor of ice cream? No? Do your self a favor and go to your nearest grocery store and buy some NOW. It’s life changing).

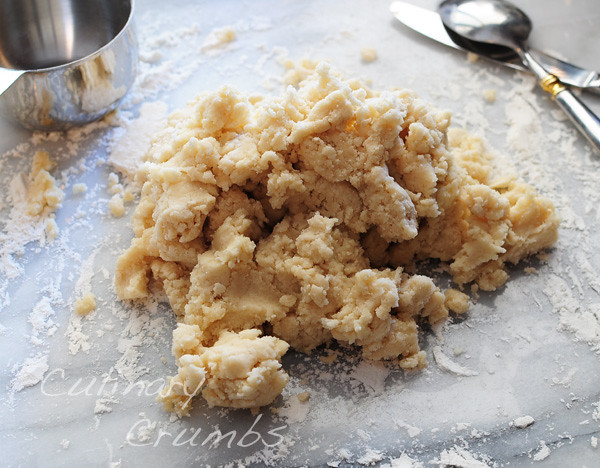
crumbly buttery dough

The days that I do crave sweets, I’m often torn between satisfying myself with something chocolate or fruity. Do I want a dessert that’s more rich and substantial or do I want something lighter and perhaps a little tart? That’s often my predicament. Decisions like this make for quite the stress filled life, I know.

June 30, 2012

Tomato, Corn and Cheddar Pie


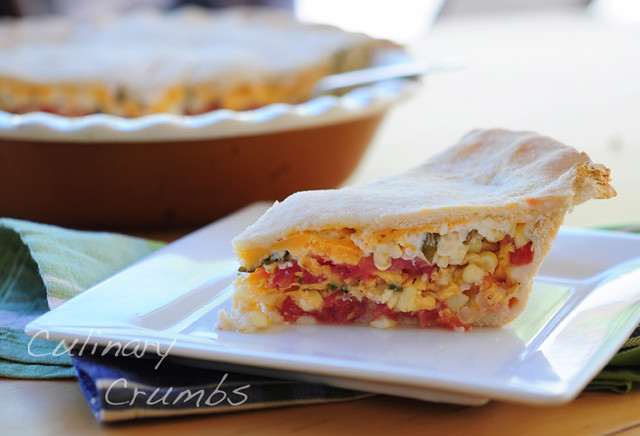
tomato & corn pie

I have been dying to make this pie for three years now.  The thing is, I forgot that I had been aching to try it until last weekend, when I was combing through my list of potential and future dishes to make for this blog.  As soon as I saw “Tomato and Corn Pie”, the yearning sensation came flooding back and all the other ideas I had in mind for that weekend’s kitchen festivities were thrown out the window.  My mind was on one track and one track only: Tomato and Corn Pie.

hothouse tomatoes and sweet summer corn

I don’t know what took me so long to actually make this pie.  It is a relatively simple process and it makes use of two of summer’s most bountiful harvests: juicy, ripe, red tomatoes and sweet, golden corn.  I first came across this pie on Smitten Kitchen’s site in August of 2009 and I remember thinking to myself how glorious and Southern this pie sounded, even though I had never heard of it before.


December 24, 2011

Christmas Croquembouche


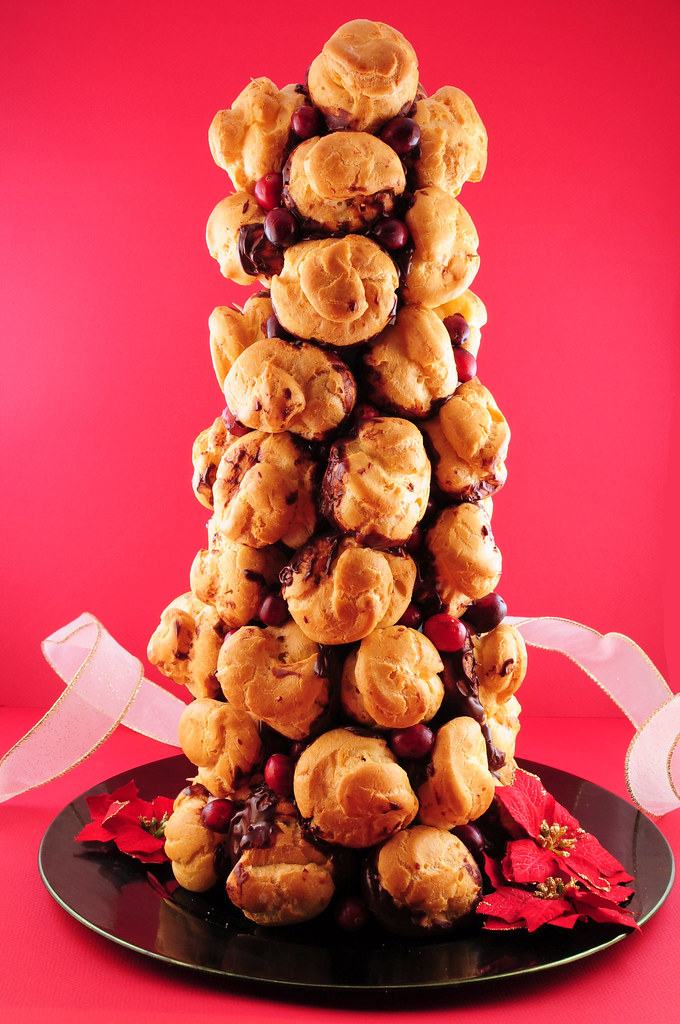
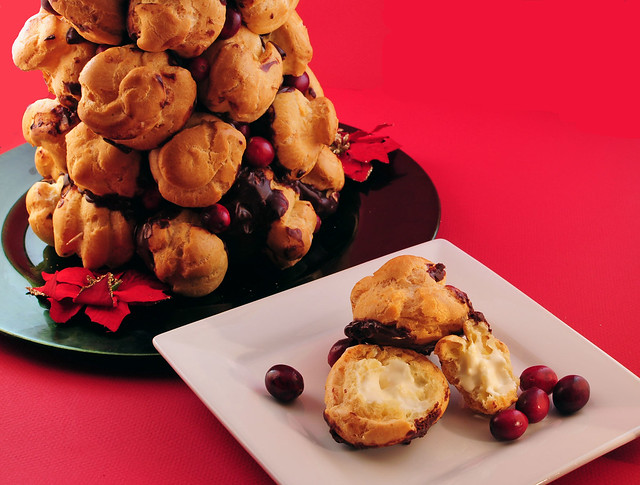
Christmas Croquembouche

It happened again, just as it does every year.  No matter how down on my luck I might be, you can guarantee that I will be bitten by the Spirit of Christmas year after year.  I don't think anyone can help it, really.  As soon as December 1st arrives, that holiday magic bursts into the air, spreading the Christmas Spirit.  It's contagious and it spreads quickly too.  All it takes is a simple wave to your neighbor and the wish of a Happy Holiday or a (less politically correct) Merry Christmas.

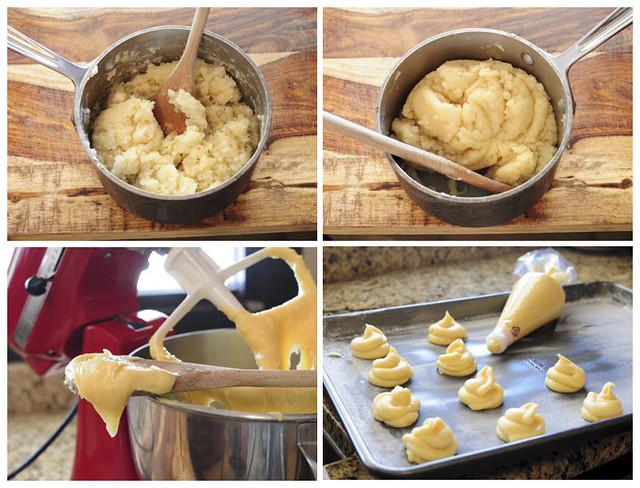
the pâte à chou process

I've been sick with the holiday cheer now for about three weeks.  I thought I had a pretty bad case of it, that is until I got home, back to Dallas, to my parents house.  My mom brings Christmas to life.  The walls reverberate with the Spirit of Christmas.  The sheer amount of decorations in the house is astonishing, but it makes you feel so warm and cozy inside.  You almost expect Santa and his elves to pop out from behind the corner somewhere.  

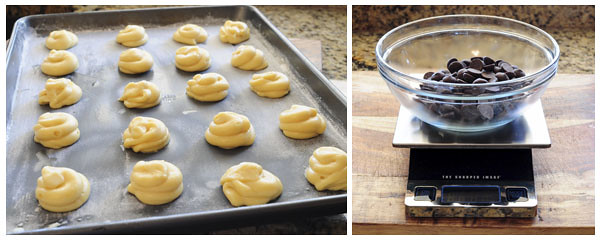
ready to bake and chocolate ready to melt

The Christmas Spirit that lives inside my parent's house inspired me to go the extra mile with a Christmas dessert this year.  I wanted it to embody this time of year.  Now tell me, what represents Christmas more than a Christmas Croquembouche?  It even looks like a Christmas tree!  

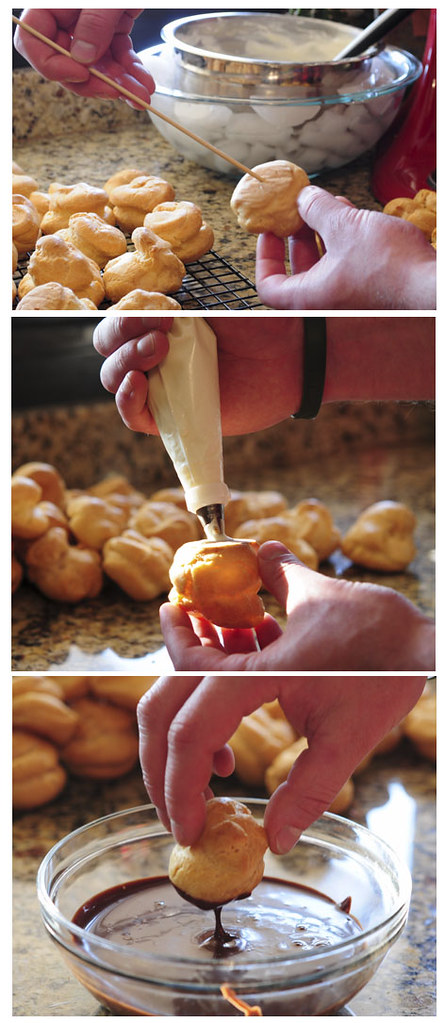
poke, fill and dip cream puffs

I'm not going to lie.  It took pretty much all day to make.  Granted, I'd have to stop to make things look pretty and take pictures, but all in all it was rather time consuming.  I even used a less traditional method that involves a styrofoam cone base.  (A traditional croquembouche would be made purely of cream puffs, from the center out).  

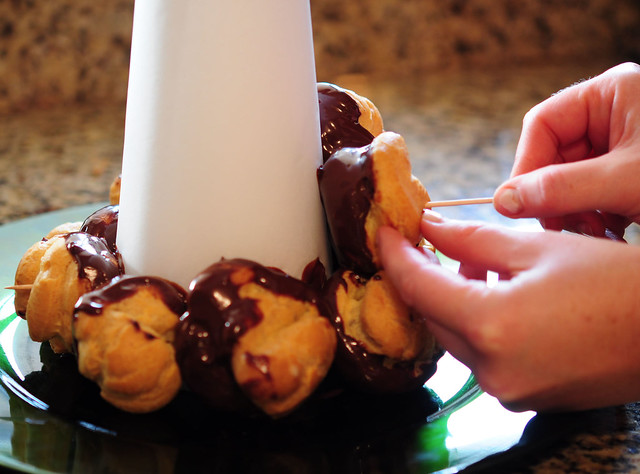
assemble the croquembouche

If I was going to make this again, and I just might have to, because it does make for a stunning presentation, I would break up the work.  The cream puffs, which make up the majority of the work, could be made two days ahead, the pastry cream filling and chocolate sauce made 1 day ahead, leaving the assembly for the morning of a festive Christmas get together.  Hey, you could even buy frozen cream puffs, eliminating most of the work, and taking all the credit for yourself.  Just don't tell anyone I told you so.  Merry Christmas!

croquembouche, pretty as a package

Croquembouche
Recipe Adapted from Epicurious.com

Ingredients:
For cream puffs (pâte à chou):
  • 1 1/4 cups water
  • 1 1/2 sticks unsalted butter, cut into 1/2" pieces
  • 1/2 tsp salt
  • 1 1/2 cups all-purpose flour
  • 6 large eggs
For pastry cream filling: 
  • 1 1/2 cups half and half
  • 1/2 cup granulated sugar
  • 2 large eggs
  • 1 large egg yolk
  • 2 tbsp all-purpose flour, sifted
  • 2 tsp vanilla extract
  • 1 cup heavy cream
For chocolate sauce:
  • 1 1/2 cups heavy cream
  • 9 oz bittersweet or semisweet chocolate, finely chopped
Assorted decorations of your choice: fresh cranberries, red hots, red and green M&Ms, silver dragées

Special Equipment:
Large pastry bag with 1/2-inch and 1/4-inch plain tips
clear tape
14-inch styrofoam cone (I bought mine at Michael's)
parchment paper
lots of toothpicks

Directions:

For cream puffs (pâte à chou):
1. Preheat oven to 425º F. 

2. To make the pâte à chou (French name for the dough used to make cream puffs), bring water in a heavy saucepan to a boil with butter and salt over high heat. Once boiling, reduce heat to medium-low. Add flour all at once and beat with a wooden spoon until mixture pulls away from sides of pan, forming a ball of dough.

3. Transfer dough to the bowl of a standing electric mixer and beat in 6 eggs, 1 at a time, on high speed, beating well after each addition. Pâte à chou batter should be stiff enough to hold soft peaks and fall softly from a spoon.

4. Butter and flour 2 baking sheets. Spoon pâte à chou into a large pastry bag fitted with a 1/2-inch plain tip and pipe about 55 mounds onto baking sheets, each about 1 1/2 inches in diameter, leaving 1 1/2 inches between mounds. With wet fingertips, gently smooth pointed tip of each mound to round puffs.

5. Bake puffs in upper and lower thirds of oven 10 minutes, switching position of sheets in oven halfway through baking. Reduce temperature to 400°F. and bake puffs 20 minutes more, or until puffed and golden, again, switching position of sheets in oven halfway through baking. Let puffs stand in turned-off oven 20 minutes. Transfer puffs to racks to cool. 

6. With a skewer, poke a 1/4-inch hole in bottom of each puff. Cream puffs may be made 2 days ahead and kept in an airtight container. Re-crisp puffs in 400°F oven 5 minutes and cool before filling. If making puffs ahead of time, wait to poke holes in each until after re-crisping and ready to assemble.

For Pastry Cream Filling:
1. Bring half and half to simmer in a heavy medium saucepan. Whisk sugar, eggs, egg yolk and sifted flour in a medium bowl to blend.

2. Gradually, and very slowly, whisk in hot half and half as to temper the egg mixture. Transfer mixture back into the saucepan. Whisk over medium-low heat until mixture thickens and comes to boil, about 5 minutes. Boil 1 minute. Pour into another medium sized bowl. Stir in vanilla. Press plastic onto surface of pastry cream. Cover and chill until cold, about 4 hours. (The pastry cream can be made up to this point 1 day ahead. Keep chilled.)

3. On the day your croquembouche will be assembled, place chilled pastry cream base into the bowl of a standing electric mixer. Beat pastry cream until just smooth and soft enough to fold in heavy cream (do not overbeat).

4. In a chilled bowl with cleaned beaters, beat heavy cream until it holds soft peaks. Fold whipped cream into pastry cream. Chill filling, covered, about 1 hour, or until cold.

For chocolate sauce:
1. Bring heavy cream to a simmer in a medium saucepan. Remove from heat and add chopped chocolate; stir until chocolate is melted and smooth. Cool sauce until lukewarm. (Sauce can be prepared 1 day ahead. Cover and refrigerate. When ready to assemble croquembouche, rewarm over low heat until just lukewarm and pourable, stirring frequently.)

To assemble the croquembouche:
1. To fill the cream puffs, transfer pastry cream filling to a large pastry bag fitted with a 1/4-inch plain tip. Insert the tip into the hole in the bottom of each cream puff and barely fill each puff (do not overfill). Set filled puffs aside.

2. Using tape, cover styrofoam cone with parchment paper. Double tape to secure the bottom of cone to a serving platter.

3. Line a tray with wax paper. Working with 1 filled cream puff at a time, dip bottom in chocolate sauce, leaving top 1/3 inch uncoated and letting excess drip off. Set aside on wax paper.

4. Once cream puffs are dipped, arrange 1 ring of puffs around base of cone, placing as closely together as possible and inserting a toothpick through each puff into cone, so as to attach puff to cone. Push toothpick as far into cone as possible.

5. Attach second ring of puffs above first, again packing tightly and staggering so puffs in second ring are not directly above puffs in first ring. Continue in same manner to attach remaining puffs. Finish covering cone with 1 puff attached to the top of cone.

6. Decorate by pushing cranberries, M&Ms, red hots or dragées into the gaps and spaces between the cream puffs.

7. To serve croquembouche, dismantle, 1 puff at a time and enjoy!

August 20, 2010

Strawberry and Rhubarb Galette

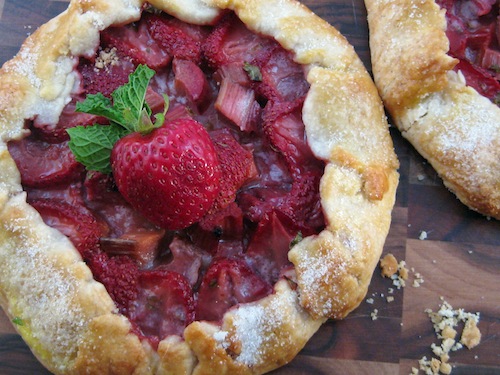
a little fresh garnish adds a nice touch

I am writing this post with extreme jubilation.  Or perhaps it's just the after effects of pure relief.  I had an intensely nightmarish occurrence happen to me last week.  My computer crashed.  Upon updating the software on my laptop, only after I was prompted to, the only activity I could get out of it was a blank, white screen.  After doing a little research, I quickly learned that this screen has been maliciously dubbed "the white screen of death."  My heart sank.  My stomach dropped.  I was suddenly unable to swallow past the lump in my throat.  And a single tear ran down my cheek (followed shortly by an unstoppable river).  All of my photos, music, recipes and meticulously crafted spreadsheets (oh yeah, in case you didn't know, I'm OCD- it's unofficially diagnosed, but painfully apparent- I like to think of it as "super-duper-organized").  Basically my whole life was digitally saved and compressed onto this one, tiny little laptop.

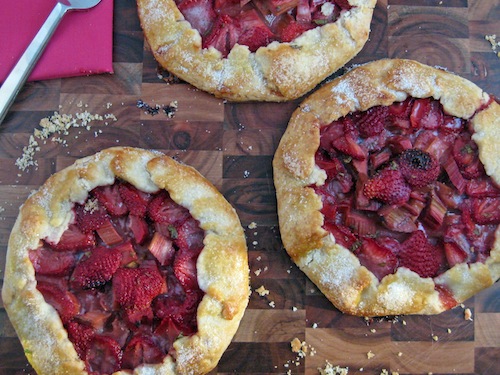
concentric circles of strawberries

I suddenly felt like Carrie Bradshaw.  Everyone started asking me if I had "backed-up." To which I would reply with a snarl.  Backing-up had never occurred to me, even though I had seen that particular episode where Carrie's computer crashes and she loses everything she had ever written.  How could I be so naive?  So before I had the chance to take my laptop into the Apple store and receive it's official sentence, I mourned the death that I was certain had befell my computer.  This is the point where my dad, mom, and brother would all tell me I was over reacting.  That I was being a drama queen (like I've never heard that before, ha).  I didn't care.  I felt I had the right to act irrational, because for all I knew my computer was dead and all my memories and work were buried among the intangible space along with it.  

how good does that crust look

I needed to take my mind off the loss.  I needed something to distract me from the harrowing thoughts of what was to become of my computer.  Ahh, yes.  A tart of some kind. The only suitable option for this sort of occasion, because nothing calms the nerves quite like a flaky pie crust does.  I had been itching to make a free form tart anyways, so this seemed like as good a time as any.  I rushed to the grocery store, grabbed what I am certain was the last of the season's rhubarb, and headed home to bake the tension out of me.  I wasn't in the mood to plan or be painstakingly precise, so I threw together a fruit filling concoction, tweaking here and there upon tasting, and placed it in the oven.  The result was surprisingly good, especially considering my state of mind and this spontaneous style of baking that I am unaccustomed to.  The galette did help to alleviate the stress of the evening and I even managed to get some sleep that night.  Perhaps, it even served as a little good luck charm, because, despite the "white screen of death," the Apple geniuses were able to recover all of my files.  So maybe I did over react just a tad, sobbing at what would now be a non-loss of all my photos, music, recipes, and meticulously crafted spreadsheets.  But I learned a valuable lesson.  You better believe I bought myself an external hard drive that day, and now I know to make a habit of backing-up.  In fact, I think I might go do that right now.

love at first bite

Strawberry and Rhubarb Galette 
by Karlie Kiser

Ingredients:
Crust:
2 cups all-purpose flour, plus more for rolling
3 tbsp granulated sugar
1/4 tsp salt
1 medium lemon, zested
1 1/2 sticks cold, unsalted butter, cut into small chunks
1 egg yolk
2 tbsp ice water, plus more if needed

Filling:
2 1/2 cups chopped rhubarb, about 1/2 pound
1/4 cup plus 2 tbsp dark brown sugar, divided
2 1/2 tbsp lemon juice, divided
pinch of salt
3 tbsp cornstarch, divided
2 tbsp uncooked, quick cooking tapioca, ground fine in  a spice mill, divided
1 1/2 pounds strawberries, hulled and sliced
1/4 cup granulated sugar
2 tbsp chopped mint
about 6 tbsp toasted, sliced almonds
1 egg yolk
1 tsp water
2 tbsp turbinado sugar (or granulated sugar)
1 tbsp cold, unsalted butter, cut into very small pieces

Topping (optional):
4 oz crème fraîche
1 tbsp granulated sugar

Directions:
1. For crust: combine flour, sugar, salt and lemon zest in a food processor (or large mixing bowl).  Add butter and pulse (or rub in with fingers if using traditional method) to combine until the mixture resembles course crumbs.

2. Add the egg yolk and ice water (1 tbsp at a time) and pulse (or again, work into the mixture with your hands) just until combined.  (Do not let the dough form a ball in the food processor, pulse just until the mixture comes together.)  There should be enough moisture in the dough so that it binds together without being too wet or sticky.  If it's still crumbly, add a little more ice water, 1 teaspoon at a time.

3. Pour the dough mixture onto a lightly floured surface and bring together forming a ball.  Pat into a disc, wrap in plastic wrap and place in the fridge for at least one hour.

4. After the dough is sufficiently chilled, separate into four equal portions.  On a lightly floured surface, roll each portion into a circle, about 1/4-inch thick.  Cover a large baking sheet with parchment paper, place dough circles on top, cover with plastic wrap and chill in the fridge for 30 minutes.

5. In the meantime, combine the rhubarb, 1/4 cup dark brown sugar, 1 tablespoon lemon juice, salt, 1 teaspoon cornstarch and 1 tablespoon ground tapioca in a medium mixing bowl.  Set aside and let stand for 30 minutes.

6. In another mixing bowl, combine the strawberries, 1/4 cup sugar, 2 tablespoons dark brown sugar, mint, 1 1/2 tablespoons lemon juice, 2 teaspoons cornstarch, and 1 tablespoon ground tapioca.  Set aside and let stand for 10-15 minutes.  Pre-heat oven to 350º F.

7. Remove the dough rounds from the fridge.  Working one at a time, sprinkle about 1 1/2 tablespoons toasted almonds on center of dough round, leaving a 1-inch border.  Place a mound of rhubarb (about 2 spoonfuls) in the center of crust.  Layer strawberry slices in an overlapping circle around the mound of rhubarb, making sure to leave the 1-inch border of dough.  Repeat on remaining dough rounds.  You should have strawberries left over.  Reserve for later use. 

8. Beat the egg yolk and 1 teaspoon water together to make an egg wash.  Brush the border of each dough round with egg wash.  Bring the edge of crust over onto the filling, leaving the fruit exposed in the center.  Gently fold and crimp the dough to seal any cracks.  Repeat on each galette. 

9. With the remaining strawberry slices, evenly divide and layer on top of other exposed strawberries on each galette.  Combine any strawberry and rhubarb juice remaining at bottom of mixing bowls.  Evenly distribute juices among each galette, spooning onto the center of each.  Chill in fridge for 15 minutes.

10. Brush the edges of each crust with remaining egg wash.  Sprinkle each crust with about 1/2 tablespoon turbinado sugar.  Dot each galette with the small pieces of butter.  Place the galettes (still on baking sheet) on the center rack of oven and bake for about 45-50 minutes, or until the crust is golden brown.  Let cool to room temperature and, if desired, serve with crème fraîche sweetened with 1 tablespoon of sugar.  Enjoy!

Makes 4 mini galettes, about 5-inches in diameter 

*This recipe might have a lot of steps and sound complicated, but I promise you it is easy, breezy!  I just wanted the recipe to be as detailed as possible so as to avoid any confusion for novice bakers. 

October 26, 2009

Pear & Gorgonzola Crostata


I have to be honest, this pear crostata is really the last thing on my mind. I am currently living in a complete state of disarray, with all of my belongings thrown askew, boxes stacked up to my ears, and paint fumes clouding my brain. Don't you just love the joys of moving? I actually had plans to make many more recipes  than I did before my time here in New York expired, but sometimes you have to set your priorities, and in this case, it would be preparing for a 1,500 mile move half way across the country. And even though I may not be thinking about the crostata as a whole, I have thought often about it's crust. During the course of this week's moving preparations, when I have often felt stressed or overwhelmed, I've let my mind wander to this happy place of butter and flaky goodness. 


The downsides of living in a New York apartment are pretty obvious; they are small and stupidly overpriced. Another disadvantage would be the poor air circulation due to the lack of central air conditioning (the fact of which still astounds me being from Texas and all- central air conditioning is vital to survival there). Simply heating the oven turns my apartment into my own personal sauna. So with my oven set to 450 degrees, I was fairly certain that my attempt to turn out a flaky pastry crust was doomed from the get go. However, I managed to somehow create one of the flakiest crusts I've had the pleasure of wrapping my lips around. I can't take all the credit of course- this isn't my recipe- but still, I was happy to pat myself on the back. 


The crust was really, to my dismay, the only truly memorable part of this particular recipe however. I have often heard that pears and blue cheese are a natural flavor pairing, but the gorgonzola was a little too overpowering in this recipe for my liking. If you are a big fan of blue cheese, however, then this recipe is certainly for you! If I were to make this again, I would definitely decrease the amount of cheese, perhaps halve it even. Or maybe I would replace the gorgonzola all together, with say, some currents? Now, Im sure this is really my job to take the initiative to perfect a recipe such as this one, but there are too many other dishes I am desperate to try! 


Pear Crostata with Honey, Gorgonzola, and Almonds 
Recipe courtesy of Tyler Florence

Ingredients:
4 pears, halved, cored, but not peeled
3 to 4 tablespoons butter
3 tablespoons honey
4 ounces gorgonzola, crumbled
1/2 cup slivered almonds
1 recipe Basic Pie Pastry, chilled 30 minutes (recipe below)
1 egg, beaten with a drizzle of cold water
2 tablespoons sugar

Directions:
1. Preheat the oven to 400 degrees F.

2. Arrange the pears, cut sides up, on a baking sheet and dot with butter. Put the baking sheet in the oven and bake 25 to 30 minutes, or until the pears are just tender. Let cool.

3. Increase the oven heat to 450 degrees F.

4. Sprinkle the counter and a rolling pin lightly with flour. Roll the dough out to a 14-inch round, about 1/4-inch thick. It doesn't have to be perfect. Transfer the dough to the back of a lightly floured baking sheet. Slice the pears and arrange them on the dough round by overlapping the slices in a spiral fashion, leaving a 2-inch border all around. Drizzle with the honey, scatter blue cheese over the top, and sprinkle with the almonds.

5. Brush the border with the egg wash. Bring the edge of crust over onto the filling, leaving the fruit exposed in center. Gently fold and pinch the dough to seal any cracks. Brush the crust with the remaining egg wash and sprinkle with the sugar. Put the baking sheet in the oven and bake for 30 minutes or until the crust is golden brown and the fruit is tender. Slide a knife under the crostata to loosen it from the pan. Then cut into wedges and serve warm or at room temperature.


Basic Pie Pastry: 

Ingredients:

2 cups all-purpose flour, plus more for rolling
3 tablespoons sugar
1/4 teaspoon salt
1 lemon, zested and finely grated
3/4 cup (1 1/2 sticks) cold, unsalted butter, cut into small chunks
1 egg yolk
2 tablespoons ice water, plus more if needed

Directions:
1. Combine the flour, sugar, salt, and lemon zest in a large mixing bowl. Add the butter and mix with a pastry blender or your fingers until the mixture resembles coarse crumbs. 


2. Add the egg yolk and ice water and work that in with your hands. (Or do the whole thing in a food processor, pulsing a couple of times to combine the dry ingredients, then pulsing in the butter, and then the egg.) Check the consistency of the dough by squeezing a small amount together between thumb and forefingers: You want there to be just enough moisture to bind the dough so that it holds together without being too wet or sticky. If it's still crumbly, add a little more ice water, 1 teaspoon at a time.


3. When you get it to the right consistency, shape the dough into a disk and wrap it in plastic. Put it in the refrigerator and chill for at least 30 minutes.

Serves 6-8