Showing posts with label Holiday Baking. Show all posts

December 24, 2011

Christmas Croquembouche


Christmas Croquembouche

It happened again, just as it does every year.  No matter how down on my luck I might be, you can guarantee that I will be bitten by the Spirit of Christmas year after year.  I don't think anyone can help it, really.  As soon as December 1st arrives, that holiday magic bursts into the air, spreading the Christmas Spirit.  It's contagious and it spreads quickly too.  All it takes is a simple wave to your neighbor and the wish of a Happy Holiday or a (less politically correct) Merry Christmas.
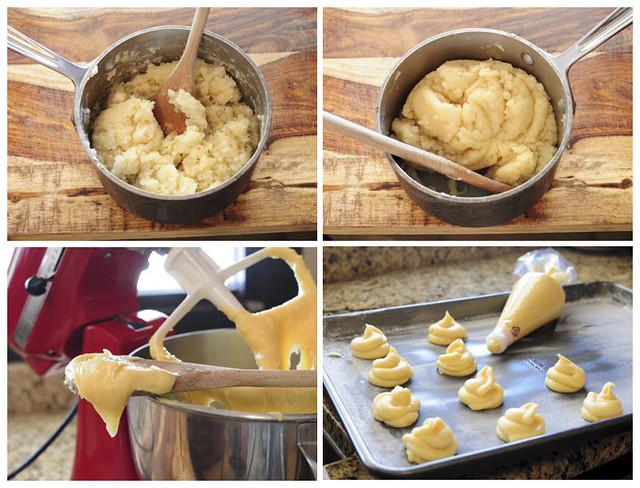
the pâte à chou process

I've been sick with the holiday cheer now for about three weeks.  I thought I had a pretty bad case of it, that is until I got home, back to Dallas, to my parents house.  My mom brings Christmas to life.  The walls reverberate with the Spirit of Christmas.  The sheer amount of decorations in the house is astonishing, but it makes you feel so warm and cozy inside.  You almost expect Santa and his elves to pop out from behind the corner somewhere.  
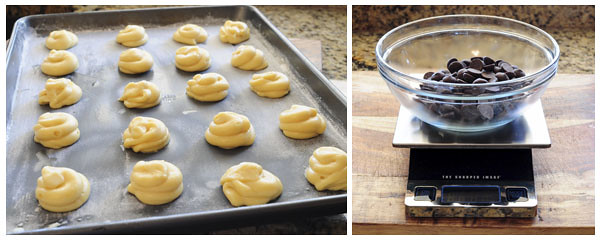
ready to bake and chocolate ready to melt

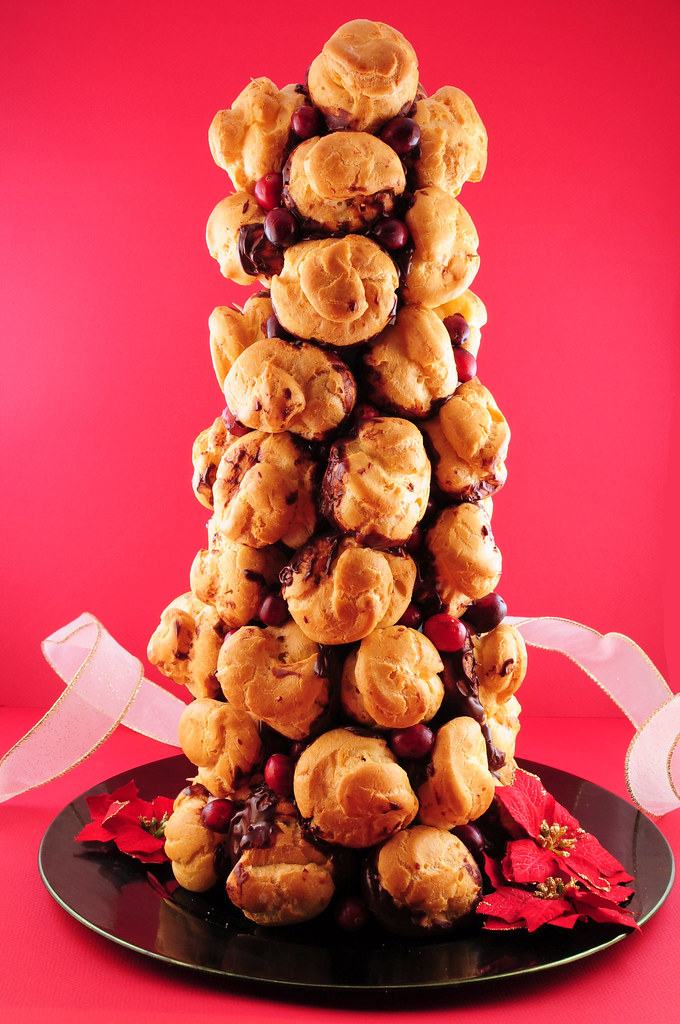
The Christmas Spirit that lives inside my parent's house inspired me to go the extra mile with a Christmas dessert this year.  I wanted it to embody this time of year.  Now tell me, what represents Christmas more than a Christmas Croquembouche?  It even looks like a Christmas tree!  
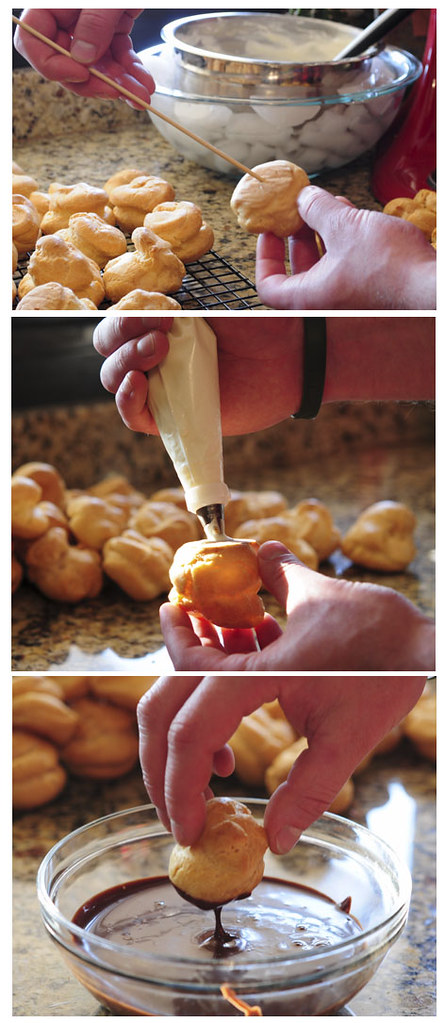
poke, fill and dip cream puffs

I'm not going to lie.  It took pretty much all day to make.  Granted, I'd have to stop to make things look pretty and take pictures, but all in all it was rather time consuming.  I even used a less traditional method that involves a styrofoam cone base.  (A traditional croquembouche would be made purely of cream puffs, from the center out).  
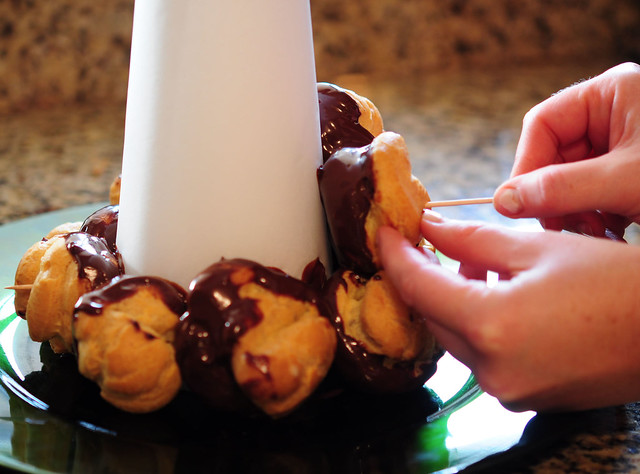
assemble the croquembouche

If I was going to make this again, and I just might have to, because it does make for a stunning presentation, I would break up the work.  The cream puffs, which make up the majority of the work, could be made two days ahead, the pastry cream filling and chocolate sauce made 1 day ahead, leaving the assembly for the morning of a festive Christmas get together.  Hey, you could even buy frozen cream puffs, eliminating most of the work, and taking all the credit for yourself.  Just don't tell anyone I told you so.  Merry Christmas!
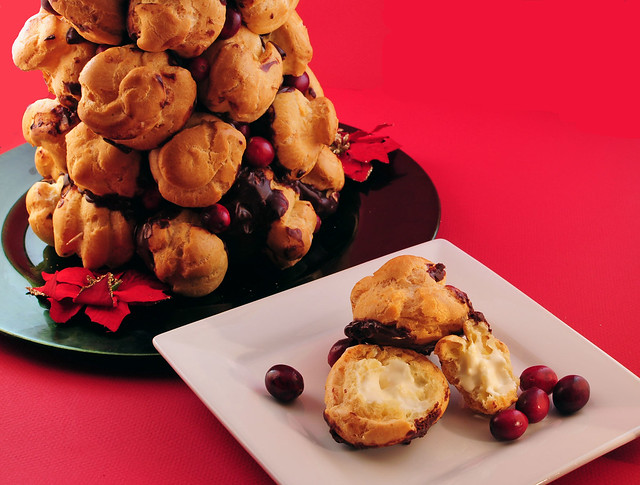
croquembouche, pretty as a package

Croquembouche
Recipe Adapted from Epicurious.com

Ingredients:
For cream puffs (pâte à chou):
  • 1 1/4 cups water
  • 1 1/2 sticks unsalted butter, cut into 1/2" pieces
  • 1/2 tsp salt
  • 1 1/2 cups all-purpose flour
  • 6 large eggs
For pastry cream filling: 
  • 1 1/2 cups half and half
  • 1/2 cup granulated sugar
  • 2 large eggs
  • 1 large egg yolk
  • 2 tbsp all-purpose flour, sifted
  • 2 tsp vanilla extract
  • 1 cup heavy cream
For chocolate sauce:
  • 1 1/2 cups heavy cream
  • 9 oz bittersweet or semisweet chocolate, finely chopped
Assorted decorations of your choice: fresh cranberries, red hots, red and green M&Ms, silver dragées

Special Equipment:
Large pastry bag with 1/2-inch and 1/4-inch plain tips
clear tape
14-inch styrofoam cone (I bought mine at Michael's)
parchment paper
lots of toothpicks

Directions:

For cream puffs (pâte à chou):
1. Preheat oven to 425º F. 

2. To make the pâte à chou (French name for the dough used to make cream puffs), bring water in a heavy saucepan to a boil with butter and salt over high heat. Once boiling, reduce heat to medium-low. Add flour all at once and beat with a wooden spoon until mixture pulls away from sides of pan, forming a ball of dough.

3. Transfer dough to the bowl of a standing electric mixer and beat in 6 eggs, 1 at a time, on high speed, beating well after each addition. Pâte à chou batter should be stiff enough to hold soft peaks and fall softly from a spoon.

4. Butter and flour 2 baking sheets. Spoon pâte à chou into a large pastry bag fitted with a 1/2-inch plain tip and pipe about 55 mounds onto baking sheets, each about 1 1/2 inches in diameter, leaving 1 1/2 inches between mounds. With wet fingertips, gently smooth pointed tip of each mound to round puffs.

5. Bake puffs in upper and lower thirds of oven 10 minutes, switching position of sheets in oven halfway through baking. Reduce temperature to 400°F. and bake puffs 20 minutes more, or until puffed and golden, again, switching position of sheets in oven halfway through baking. Let puffs stand in turned-off oven 20 minutes. Transfer puffs to racks to cool. 

6. With a skewer, poke a 1/4-inch hole in bottom of each puff. Cream puffs may be made 2 days ahead and kept in an airtight container. Re-crisp puffs in 400°F oven 5 minutes and cool before filling. If making puffs ahead of time, wait to poke holes in each until after re-crisping and ready to assemble.

For Pastry Cream Filling:
1. Bring half and half to simmer in a heavy medium saucepan. Whisk sugar, eggs, egg yolk and sifted flour in a medium bowl to blend.

2. Gradually, and very slowly, whisk in hot half and half as to temper the egg mixture. Transfer mixture back into the saucepan. Whisk over medium-low heat until mixture thickens and comes to boil, about 5 minutes. Boil 1 minute. Pour into another medium sized bowl. Stir in vanilla. Press plastic onto surface of pastry cream. Cover and chill until cold, about 4 hours. (The pastry cream can be made up to this point 1 day ahead. Keep chilled.)

3. On the day your croquembouche will be assembled, place chilled pastry cream base into the bowl of a standing electric mixer. Beat pastry cream until just smooth and soft enough to fold in heavy cream (do not overbeat).

4. In a chilled bowl with cleaned beaters, beat heavy cream until it holds soft peaks. Fold whipped cream into pastry cream. Chill filling, covered, about 1 hour, or until cold.

For chocolate sauce:
1. Bring heavy cream to a simmer in a medium saucepan. Remove from heat and add chopped chocolate; stir until chocolate is melted and smooth. Cool sauce until lukewarm. (Sauce can be prepared 1 day ahead. Cover and refrigerate. When ready to assemble croquembouche, rewarm over low heat until just lukewarm and pourable, stirring frequently.)

To assemble the croquembouche:
1. To fill the cream puffs, transfer pastry cream filling to a large pastry bag fitted with a 1/4-inch plain tip. Insert the tip into the hole in the bottom of each cream puff and barely fill each puff (do not overfill). Set filled puffs aside.

2. Using tape, cover styrofoam cone with parchment paper. Double tape to secure the bottom of cone to a serving platter.

3. Line a tray with wax paper. Working with 1 filled cream puff at a time, dip bottom in chocolate sauce, leaving top 1/3 inch uncoated and letting excess drip off. Set aside on wax paper.

4. Once cream puffs are dipped, arrange 1 ring of puffs around base of cone, placing as closely together as possible and inserting a toothpick through each puff into cone, so as to attach puff to cone. Push toothpick as far into cone as possible.

5. Attach second ring of puffs above first, again packing tightly and staggering so puffs in second ring are not directly above puffs in first ring. Continue in same manner to attach remaining puffs. Finish covering cone with 1 puff attached to the top of cone.

6. Decorate by pushing cranberries, M&Ms, red hots or dragées into the gaps and spaces between the cream puffs.

7. To serve croquembouche, dismantle, 1 puff at a time and enjoy!

December 7, 2011

Perfect Popovers with Strawberry Butter


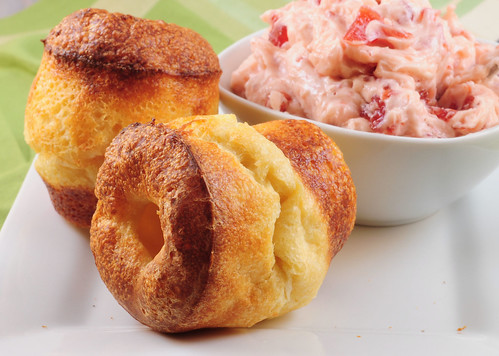
perfect popovers

Somehow, someway, the holiday season is already in full swing.  I feel like it was just summer time, as if I was just running errands in flip flops and out walking Dexter in shorts and a tank top.  Come to think of it, I was just wearing flip flops and tank tops.  I live in Arizona now, after all.  Unseasonably warm weather aside, December crept up on me this year.  2011 in general has been a whirlwind, but these last few months in particular have flown by.  I know that Christmas morning will be here before I know it, which means I better get a move on my Christmas shopping.

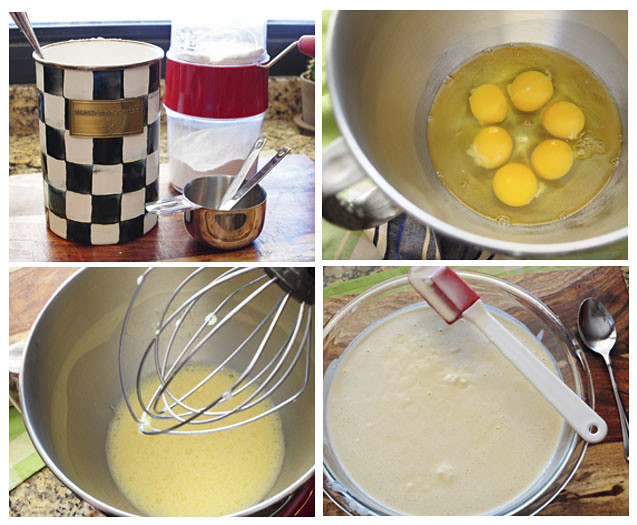
the popover process

As much as I like buying the perfect gift for a loved one, I'd rather make someone's face light up through the perfect holiday meal instead.  Cooking in my kitchen, glass of wine in hand, is simply more enjoyable, as far as I'm concerned, than fighting the crowds at the mall during this time of year.

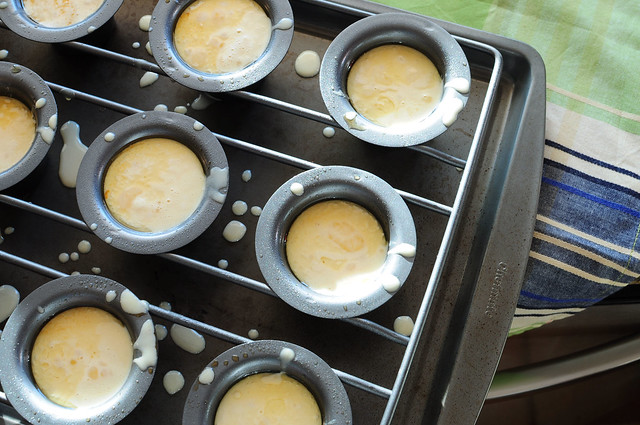
ready for the oven

Growing up, my family spent Christmas Eve celebrating with several other families.  Each family provided a certain dish of either ham, dips, appetizers or a simple dessert.  The idea was to mix and mingle and munch.  Every Christmas morning my mom would make breakfast burritos and cinnamon rolls, keeping the food simple so that she could spend as much time with my brother and I, helping us set up and play with our new toys Santa had so lovingly left beneath the tree.

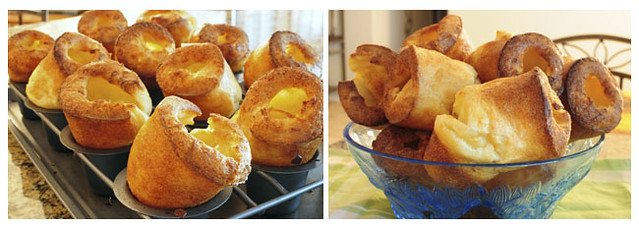
popovers high as the sky

As I get older, I am starting to think about the traditions I want to eventually instill in my family.  Do I want to go the way of a Christmas feast, complete with a roasted rack of lamb, or do I want to follow in my mother's footsteps, providing an uncomplicated, yet heart warming menu.  Knowing myself, I'll probably do a little bit of both.  But there is one item I know I'll include.  It has that impressive quality that I typically like to showcase, but it's also deceptively simple to make.  Enter the popover.

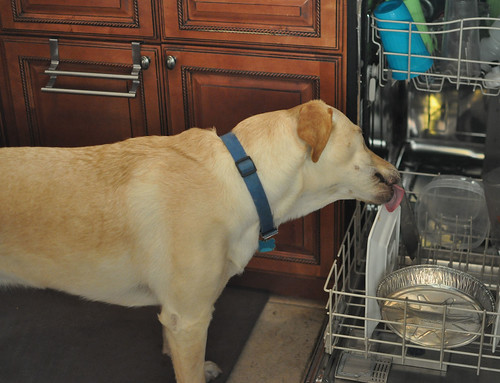
my own personal dishwasher

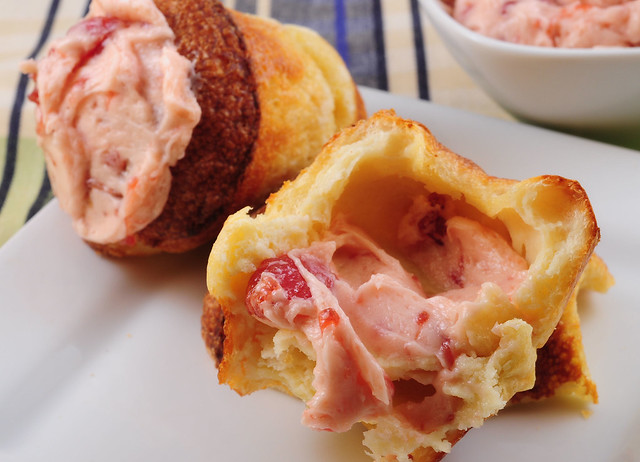
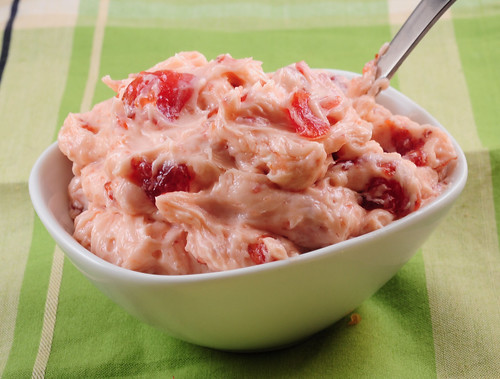
I can always count on popovers to induce "oohing and ahhing" from my guests.  Not only are popover's sky high heights a sight to behold, but they are also airy, eggy and simply delicious.  I usually serve popovers with a side of honey butter.  This time around, however, I thought I'd try something a little different, strawberry butter.  Boy, am I glad I did.  This butter helps popovers make the move from  simple side to main event, tasty enough to be served up as dessert.

eggy, airy popover

Popovers with Strawberry Butter
Recipe Adapted from Neiman Marcus via Grouprecipes.com

Ingredients:
3 1/2 cups whole milk
4 cups all-purpose flour
1 1/2 tsp salt
1 tsp baking powder
6 large eggs, at room temperature
Strawberry Butter (recipe follows)
* special equipment: nonstick popover pan

Directions:
1. Place milk in a bowl or glass measuring cup and microwave for two minutes or until warm to the touch.  Set aside.

2. Sift flour, salt and baking powder together into a large bowl.  Crack eggs into the bowl of a stand mixer.  Using the whisk attachment, whisk on medium speed for about 3 minutes, until foamy.  Turn mixer speed down to low and gradually add the warm milk.  Next, gradually add the flour mixture and beat for 2 minutes.  Let the batter rest at room temperature for 1 hour. 

3. Preheat oven to 450º F.  Spray popever pan generously with nonstick spray.  Fill each well almost to the top with batter and place the popover pan on a cookie sheet.  Transfer to the oven and bake for 15 minutes.  Turn the heat down to 375º F and continue to bake for 10 minutes longer, until the popovers are deep golden brown.  Remove pan from oven, pop out the popovers and let cool on a wire rack.  Serve hot with Strawberry Butter. 

* There will be extra batter left over.  Just set aside and use once the first batch of popovers are finished.

Makes approximately 18 popovers


strawberry butter

Strawberry Butter

Ingredients:
3/4 cup butter (1 1/2 sticks), at room temperature
1/2 cup good quality strawberry preserves

Directions:
1. Place butter in a medium sized bowl and beat with an electric mixture until smooth, about 2 minutes. Add the strawberry preserves and continue to beat until fluffy, about 2 more minutes. 

December 24, 2010

Pumpkin Whoopie Pies


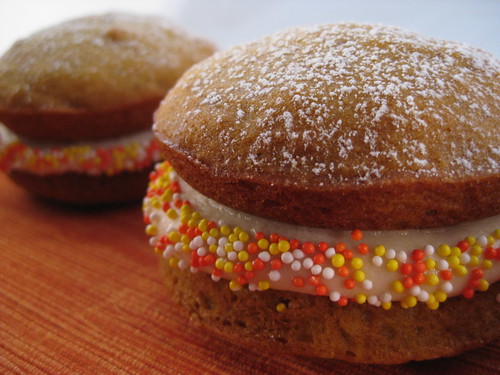
i wanna lick that frosting

I realize that pumpkin is technically more suited for the likes of November's seasonal eating.  You're probably thinking that perhaps I should have made an egg nog inspired whoopie pie or even basic chocolate ones flecked with peppermint candy canes. But ya know what?  I had already made these. Over a month ago. And I had already photographed these.  So I thought, the hell with it.  I'm posting them anyway.

Come to think of it, why do we, on average, only eat pumpkin one month out of the year?  It's sold year round in supermarkets, the canned version anyway.  It's delicious. It's healthy.  So why not?  Maybe I'll just have to make it my mission to change this.

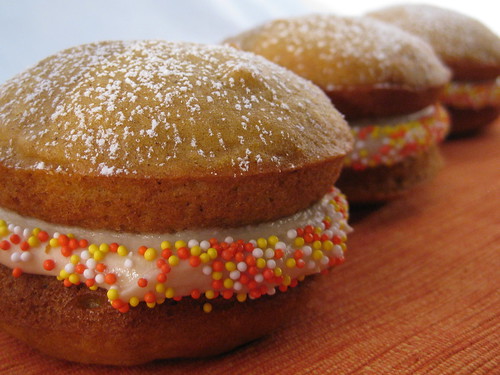
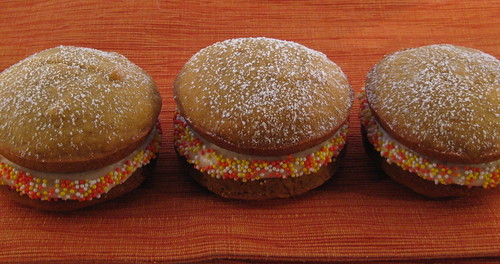
three little whoopies all in a row...

Pumpkin or no pumpkin, however, whoopie pies are becoming increasingly popular.  Some even claim it's on its way to replacing the cupcake as the next "It" dessert.  There are others out there, however, who believe it's the French macaroon that is on its way to the top.  I prefer macaroons to whoopie pies, but macaroons take a skilled hand. (You might recall this from last December- a humiliating display of macaroon technique. I plan to give this another go within the upcoming weeks). The beauty of the whoopie pie although, is that there is basically an endless array of flavor combinations.  If it can work as a cupcake (or cake), it can work as a whoopie pie.  After all, whoopie pies began their existence as a way to use up leftover cake batter, which is merely plopped by the spoonful onto a baking sheet, the same way cookie dough is.

Now, the whoopie pie purist might be some what put off by my use of a cream cheese frosting in this recipe. Original whoopie pies were made with a marshmallow fluff filling, but that's not very fun.  Or creative.  Or very forgiving to flavor additions. So I'll make my whoopie pies any way I see fit.  And you can too.

Whoopie! I love pies!


Pumpkin Whoopie Pies with Maple Cream Cheese Frosting

Pumpkin Spice Cake
recipe heavily adapted from Bon Appètit 

Ingredients:
3 cups all purpose flour
2 teaspoons baking soda
2 teaspoons baking powder
1 teaspoon cinnamon
1/2 teaspoon ground ginger
1/4 teaspoon ground cloves
1/4 teaspoon freshly grated nutmeg
1/4 teaspoon ground allspice
1 15-ounce can pure pumpkin
1 1/2 cups sugar
1 1/4 cups vegetable oil
4 large eggs
1 teaspoons finely grated orange peel

Directions:
1. Preheat oven to 350°F. Lightly spray a whoopie pie pan with nonstick cooking spray. (If not using a whoopie pie pan, use a large baking sheet lined with parchment paper). Whisk first 8 ingredients in large bowl. Using electric mixer, beat pumpkin, sugar, and oil in another large bowl. Add eggs 1 at a time, beating to incorporate between additions. Mix in orange peel. Add flour mixture; beat on low speed until just combined. Spoon 2 tablespoons of batter into each cavity of pan; spread batter to the edges. Cavity should be about 2/3 full. (If not using pan, drop 2 tablespoons of batter on to prepared baking sheet and flatten slightly with the back of a spoon).

2. Bake for 8-10 minutes or until the top of the cake springs back when touched. Cool in pan 8 minutes. Remove cakes from pan and allow to cool completely on a wire rack before filling. Repeat process with remaining batter. 

3. To assemble pies, spread frosting (or pipe with a piping bag filled with frosting) on the flat side of half the cakes.  Top each frosted cake with another cake.  Voila! 

*I poured sprinkles around the edges of the frosting for added decoration.  Chopped pecans would be yummy too!
makes 20-24 whoopie pies

Maple Cream Cheese Frosting

Ingredients:
16 oz cream cheese, softened
1 cup butter softened
6 cups confectioner's sugar
6 tablespoons pure maple syrup
1/2 tsp maple extract (optional)

Directions:
1. Beat the cream cheese and butter together in a large bowl until blended and creamy.  Gradually add the confectioners sugar and beat until combined.  Add the maple syrup and extract if using and beat until smooth.  Store in refrigerator for up to one week. 

makes 3 cups

December 24, 2009

12 Days of Goodies- Day 12: Christmas Sugar Cookies


It's finally the twelfth and final day! I never thought I would say this, but I am pretty relieved to be getting a break from the kitchen! And to close out this 12 day series I've been doing, I thought it appropriate to end on something traditional, like sugar cookies. I grew up decorating sugar cookies every Christmas Eve. But this is my first year to attempt a somewhat professional finish on them. I know they are no where near professional grade, but for a first timer at making royal icing, and practicing certain techniques such as outlining and flood filling, I think I did an A OK job. I imagine that the art of cake and cookie decorating only improves with practice.

I hope everyone has enjoyed my "12 Days of Goodies", but now I'm going to join in on the Christmas Festivities and take a much needed vacation. See ya'll in 2010!


Sugar Cookies
Recipe courtesy of Alton Brown for Food Network

Ingredients:
3 cups all-purpose flour
3/4 teaspoon baking powder
1/4 teaspoon salt
1 cup unsalted butter, softened
1 cup sugar
1 egg, beaten
1 tablespoon milk
Powdered sugar, for rolling out dough

Directions:
1. Sift together flour, baking powder, and salt. Set aside. Place butter and sugar in large bowl of electric stand mixer and beat until light in color. Add egg and milk and beat to combine. Put mixer on low speed, gradually add flour, and beat until mixture pulls away from the side of the bowl. Divide the dough in half, wrap in waxed paper, and refrigerate for 2 hours.

2. Preheat oven to 375 degrees F.

3. Sprinkle surface where you will roll out dough with powdered sugar. Remove 1 wrapped pack of dough from refrigerator at a time, sprinkle rolling pin with powdered sugar, and roll out dough to 1/4-inch thick. Move the dough around and check underneath frequently to make sure it is not sticking. If dough has warmed during rolling, place cold cookie sheet on top for 10 minutes to chill. Cut into desired shape, place at least 1-inch apart on greased baking sheet, parchment, or silicone baking mat.

4. Bake for 7 to 9 minutes or until cookies are just beginning to turn brown around the edges, rotating cookie sheet halfway through baking time. Let sit on baking sheet for 2 minutes after removal from oven and then move to complete cooling on wire rack. Serve as is or ice as desired. Store in airtight container for up to 1 week.

Makes about 3 dozen 2 1/2" cookies

**For a great Royal Icing recipe and fantastic tips on cookie decorating, visit Good Things Catered!


December 23, 2009

12 Days of Goodies- Day 11: Banana Bread Pudding


As much as I try to venture out and try new things, until today, I had yet to ever put a spoonful of bread pudding in my mouth. My mom is not a fan of bread pudding, which I guess could explain why I had never eaten it. All my life, the mere mention of the words bread pudding, put a frown on my mother's face. Naturally, I felt compelled to change her mind. Perhaps convert her to a bread pudding lover or connoisseur of sorts. But realistically speaking, I'd be happy if I could get her to take just one bite, and nod with the slightest bit of approval. That was the goal in mind.

I absolutely love banana bread , so I figured bread pudding based off this childhood favorite of mine, could only increase my chances for winning over my mom. I also added a good helping of chocolate chips, because there are few things that contain chocolate that my mom doesn't like. I can't say I necessarily succeeded in my mission; bread pudding will always be one of those things my mom would rather not eat (kind of like my aversion to scallops). But at least I can now say I've tried bread pudding, and I guess all that matters, is that I liked it.


Banana Bread Pudding
Recipe adapted from The Dallas Morning News

Ingredients:
6 cups soft French bread cubes, loosely packed
4 tablespoons butter, melted
2 cups heavy cream
1 cup milk (preferably 2% or whole milk)
5 egg yolks
2/3 cup sugar
1 teaspoon vanilla extract
1/2 teaspoon ground cinnamon
1/8 teaspoon nutmeg
2 cups mashed ripe banana
1 tablespoon fresh lemon juice
1 cup semi-sweet chocolate chips

Directions:
1. Lightly grease a 9x13 inch glass baking dish with butter.

2. Cut the bread into bite-size cubes (do not use the crust if it is tough) and place in the prepared dish

3. Drizzle the melted butter over the bread cubes, tossing the cubes while drizzling butter. Stir and toss the cubes to distribute the butter as evenly as possible. Set aside.

4. Pour the cream and milk into a small saucepan and bring it just to a boil over medium heat. Meanwhile, place the egg yolks in a small mixing bowl and beat lightly with whisk. When the cream mixture boils, remove from heat and allow to cool slightly. Whisk in the egg yolks, sugar, vanilla, cinnamon, and nutmeg. Pour mixture over the bread cubes. Cover the dish with foil and refrigerate at least one hour (and up to four hours) so the bread can absorb the milk mixture.

5. Preheat the oven to 325º F. Remove the bread pudding from the refrigerator and uncover. Combine the bananas, lemon juice, and chocolate chips in a small bowl. Stir the banana mixture into the bread pudding and smooth the top with a spatula. Re-cover the dish and cut six small holes in the foil so steam can escape. Bake, covered with foil, until set, about 50 minutes to one hour.

6. Remove the bread pudding from the oven and cool 15 to 20 minutes. Serve warm in dessert bowls with caramel or fudge and ice cream, if desired.

Makes 12 servings

December 22, 2009

12 Days of Goodies- Day 10: Meyer Lemon and Wild Blueberry Scones


It's hard to believe that I've only been doing this for 10 days, because it feels like a whole lot longer! I hate to admit it, but I'm actually looking forward to a break from the kitchen. I'm starting to lose my sanity ever so slowly. At this point, however, I'm not so much concerned about my sanity, so much as my waist line. I'm literally forcing baked goods upon friends and neighbors, begging them to take things off my hands before I fall into a sugar induced coma, or worse, the next jean size.

But in the meantime, during a couple more days of insanity and chaos, we've got three more sugar filled treats to enjoy. This one being meyer lemon and wild blueberry scones. I've always been a sucker for scones. They sound so sophisticated, especially when eaten with clotted cream. But I actually chose to eat these particular scones with lemon curd. Sadly, it wasn't homemade, but this stuff is so divine, you would never know it came from a jar. It's Stonewall Kitchen Lemon Curd. mmmmmm. Soo good.


Meyer Lemon and Wild Blueberry Scones
Recipe courtesy of Epicurious.com

Ingredients:
3 cups self-rising flour
1/2 cup plus 1 1/2 tablespoons sugar
3/4 cup (11/2 sticks) chilled unsalted butter, cut into 1/2-inch cubes
1 1/2 cups dried wild blueberries (about 10 ounces)
1 cup plus 1 tablespoon buttermilk
1 1/2 tablespoons finely grated Meyer lemon peel or regular lemon peel

Directions:
1. Position rack in top third of oven and preheat to 425°F. Line large baking sheet with parchment paper.

2. Whisk self-rising flour and 1/2 cup sugar in large bowl. Using fingertips, rub in chilled butter until pieces are size of small peas. Add dried wild blueberries and toss to coat. Mix 1 cup buttermilk and finely grated lemon peel in glass measuring cup. Pour buttermilk mixture into dry ingredients and stir until dough begins to form (some of flour will not be incorporated).

3. Transfer dough to lightly floured work surface and gather together. Knead dough briefly, about 5 turns. Divide dough in half. Form each dough half into ball and flatten into 1-inch-thick disk. Cut each disk into 6 wedges.

4. Transfer scones to prepared baking sheet, spacing 1 inch apart. Brush tops with remaining 1 tablespoon buttermilk and sprinkle with remaining 1 1/2 tablespoons sugar. Bake until scones are golden brown on top and toothpick inserted into center comes out clean, about 25 minutes.

Makes 12 scones

December 21, 2009

12 Days of Goodies- Day 9: Raspberry Macarons


If any of you know what an authentic macaron really looks like, then I'm sure you're wondering what in the heck happened to mine. These cookies were actually what I was most excited about making for my 12 day Christmas series, but to my dismay, these are what I ended up with. I did give it my best shot though, twice actually. And though I would normally not post something so disappointing, I had to post something for day number 9. They actually tasted pretty good, they just didn't have that crisp, crunchy, airy, ethereal texture that the outside meringue cookie is supposed to have. 

I honestly don't know where I went wrong. I followed the recipe to a "tee", and even paid special attention to François Payard's (pastry genius) words of wisdom for steps to success: making a smooth macaronade (the powdered sugar and almond flour base), a fluffy meringue, being attentive during baking, and having plenty of filling. Alas, my first attempt at making macarons was less than perfect, which if you know me at all, you would know that anything besides perfection is not often accepted. But what am I to do? That's the beauty about cooking though I guess; there is always room to grow. So consider this one recipe not yet accomplished, because one day, sooner or later, I'll get it right. Trust me. But in the mean time, I'm accepting any helpful tips or hints anyone could pass my way. At least the pictures are pretty. 


Raspberry Macarons
Recipe Courtesy of Food and Wine Magazine, December 2009

Ingredients
:
1 cup confectioners' sugar
1 cup almond flour (finely ground blanched almonds, available in supermarkets)
3 large egg whites, at room temperature
1/2 cup granulated sugar
2 tablespoons water
2 or 3 drops red food coloring
1/2 cup seedless raspberry jam

Directions:
1. Preheat the oven to 400° and position racks in the upper and lower thirds. Line 2 baking sheets with parchment paper.

2. In a large, wide bowl, using a large rubber spatula or a handheld electric mixer, mix the confectioners' sugar and the almond flour with 1 of the egg whites until evenly moistened.

3. In a small saucepan, combine the granulated sugar with the water and bring to a boil; using a moistened pastry brush, wash down any crystals on the side of the pan. Cook over high heat until the syrup reaches 240° on a candy thermometer.

4. In another large bowl, using clean, dry beaters, beat the remaining 2 egg whites at medium-high speed until soft peaks form. With the mixer at high speed, carefully drizzle the hot sugar syrup over the whites and beat until firm and glossy. Beat in the food coloring until the meringue is bright pink.

5. Stir one-fourth of the meringue into the almond mixture. Using a rubber spatula, fold in the remaining meringue. Transfer the meringue to a pastry bag fitted with a plain 1/2-inch tip; pipe onto the prepared baking sheets in 1 1/2-inch mounds, 1 inch apart. Tap the sheets and let dry for 15 minutes.

6. Transfer the meringues to the oven and immediately turn off the heat. Bake the meringues for 5 minutes. Turn the oven on to 400° again and bake the meringues for 8 minutes, until they are puffed and the tops are firm and glossy. Transfer the baking sheets to racks and let cool completely. Peel the meringues off of the parchment paper.

7. Spoon the jam into a small pastry bag fitted with a 1/4-inch tip. Alternatively, use a resealable sturdy plastic bag and snip off a corner. Pipe the preserves onto the flat sides of half of the meringues. Top with the remaining meringues and serve.

Makes 20 macarons

December 20, 2009

12 Days of Goodies- Day 8: Apple Cider Doughnut Holes


So I'm sure you're wondering where the doughnuts are, if I made doughnut holes, right? Well, I did in fact make them, I just chose not to show them to you. They were rather... unsightly. It may be hard to tell from the picture, but these doughnut holes are actually quite large. Probably 2 or 3 times the size of your average, run of the mill doughnut hole. The frying oil acted as some kind of mutant enhancement serum, making the once tiny, round forms of dough, grow into these large, irregular puffs. So you can only imagine what the actual doughnuts looked like.

I had never even heard of an apple cider doughnut, until I saw them posted on Smitten Kitchen back in October. There, Deb (the author of that particular blog, which is pretty fantastic by the way) reminisced about these doughnuts, and their unique flavor. I could only assume they were a north eastern thing. Well, since that fateful day in October, I have been dying to join in this New England tradition. And although my doughnuts tasted quite yummy, the appearance was not really what I was expecting. But as they say, it's what's on the inside that counts.


Apple Cider Doughnut Holes
Recipe courtesy of Smitten Kitchen

Ingredients:
1 cup apple cider
1 medium Cortland apple, cored, peeled, and chopped
3 1/2 cups flour, plus additional for the work surface
2 teaspoons baking powder
1 teaspoon baking soda
1/2 teaspoon ground cinnamon
1/2 teaspoon salt
1/8 teaspoon ground nutmeg
4 tablespoons (1/2 stick or 2 ounces) butter, at room temperature
1 cup granulated sugar
2 large eggs
1/2 cup buttermilk
Vegetable oil for frying

For cinnamon-sugar coating:
1 cup granulated sugar
1 teaspoon ground cinnamon

For apple cider glaze:
1 cup apple cider (reduced over medium heat in a small saucepan to about 1/4 cup)
1 cup confectioner's sugar

Directions:
1. In a saucepan over medium to medium-low heat, combine the chopped apples and apple cider. Cover and cook until the apples are softened, about 5 minutes. Uncover and continue to cook until the apple cider is reduced to about 1/4 cup, about 10 minutes. Set aside to cool.

2. Meanwhile, in a bowl, combine the flour, baking powder and soda, cinnamon, salt and nutmeg. Set aside.

3. Using an electric mixer on medium speed (with the paddle attachment, if using a stand mixer) cream the butter and granulated sugar together. Add the eggs, one at a time, and continue to beat until the eggs are completely incorporated. Use a spatula to scrape down the sides of the bowl occasionally. Reduce the speed to low and gradually add the reduced apple cider mixture and the buttermilk, mixing until just combined. Add the flour mixture and continue to mix just until the dough comes together.

4. Line two baking sheets with parchment or wax paper and sprinkle them generously with flour. Turn the dough onto one of the sheets and sprinkle the top with flour. Flatten the dough with your hands until it is about 1/2 inch thick. Use more flour if the dough is still wet. Transfer the dough to the freezer until it is slightly hardened, about 20 minutes. Pull the dough out of the freezer. Using a 3-inch or 3 1/2-inch doughnut cutter — or a 3 1/2-inch round cutter for the outer shape and a 1-inch round cutter for the hole, cut out doughnut shapes, (or do as I did, and use just the 1-inch cutter to makes only doughnut holes). Place the cut doughnuts and doughnut holes onto the second sheet pan. Refrigerate the doughnuts for 20 to 30 minutes.

5. While the doughnuts are chilling in the fridge, make the apple cider glaze by whisking together the confectioner's sugar and apple cider reduction until smooth. Combine the granulated sugar and ground cinnamon to make the cinnamon-sugar coating. Set both aside.

6. Add enough oil to a deep-sided pan to measure a depth of about 3 inches. Attach a candy thermometer to the side of the pan and heat over medium heat until the oil reaches 350° F. Have a plate lined with several paper towels ready.

7. Carefully add a few doughnuts to the oil, being careful not to crowd the pan, and fry until golden brown, about 60 seconds. Turn the doughnuts over and fry until the other side is golden, 30 to 60 seconds. Drain on paper towels for a minute after the doughnuts are fried. Coat both sides of each doughnut in the cinnamon-sugar mixture, then drizzle all doughnuts with the apple cider glaze. Serve immediately.

Makes about 18 doughnuts and doughnut holes, or 3 dozen doughnut holes


December 19, 2009

12 Days of Goodies- Day 7: Pistachio, Cherry, and White Chocolate Biscotti


I've aways liked the idea of dipping a crisp, sweet piece of biscotti in my coffee... perhaps as I'm sitting in a café... reading a good book... listening to French music. Ok, so that's kind of a cliché, but that's the image that comes to mind when I think of biscotti. (That does sound like a great way to while away the hours though, huh?)

The best thing about doing this 12 days series, is that I've been able to make so many things that I've always wanted to. And believe it or not, biscotti has always been high on that list. And the great thing about biscotti, is that there is really no limit as to what you can do with it. You could make almond and lemon biscotti, chocolate hazelnut biscotti, vanilla and honey biscotti, even a savory biscotti! Well, I chose this pistachio, cherry, and white chocolate biscotti, because I liked the colorful cross section of it. And technically, the recipe called for dried raspberries, but I was unable to find any. So I went with cherries. Actually what I found was razzcherries (?) I'm guessing that has to be somewhat related to raspberries, right?


Pistachio, Cherry, and White Chocolate Biscotti
Recipe courtesy of Epicurious.com

Ingredients:
3 cups all purpose flour
2 teaspoons baking powder
1/2 teaspoon salt
1 cup sugar
3 large eggs
2 tablespoons canola oil
2 1/2 teaspoons almond extract
3/4 cup shelled raw unsalted natural pistachios
1 cup dried raspberries or chopped dried strawberries (about 5 ounces) (I used dried cherries)
1/2 cup chopped high-quality white chocolate (such as Lindt or Perugina)
8 ounces high-quality white chocolate and/or 8 ounces bittersweet or semisweet chocolate, chopped

Directions:
1. Preheat oven to 350°F. Line large baking sheet with parchment paper. Whisk flour, baking powder, and salt in medium bowl to blend. Using electric mixer, beat sugar, eggs, oil, and almond extract in large bowl until well blended. Add flour mixture and beat until combined (the batter should be very stiff). Stir in pistachios, dried berries, and 1/2 cup chopped white chocolate. Drop dough by heaping tablespoonfuls in two 12-inch-long strips on prepared baking sheet, spacing strips 3 inches apart. Using wet fingertips, shape each strip into 3-inch-wide log, pressing evenly (logs may look slightly lumpy).

2. Bake logs until lightly browned and almost firm to touch, about 30 minutes. Cool logs on sheet 30 minutes. Reduce oven temperature to 325°F.

3. Carefully transfer logs to cutting board. Line same baking sheet with parchment paper. Cut each log crosswise into generous 1/2-inch-thick slices. Stand biscotti upright, spacing about 1/4 inch apart, in 3 rows on prepared baking sheet. Bake until pale golden (biscotti may be soft but will firm as they cool), about 20 minutes. Cool completely on baking sheet.

4. Line another large baking sheet with parchment paper. Place 8 ounces chopped white chocolate in medium glass bowl. Place 8 ounces chopped bittersweet chocolate in another medium glass bowl, if desired. Microwave separately on medium in 20-second intervals just until chocolate is soft to touch, about 40 seconds total (do not overheat or chocolate will burn or seize). Stir chocolate until smooth.

5. Dip 1 end or 1 side of each biscotti in chocolate; place on baking sheet. Chill until chocolate is set, about 30 minutes. (Can be made ahead. Arrange in single layer in airtight container and chill up to 5 days or freeze up to 2 weeks.)

Makes about 3 dozen


December 18, 2009

12 Days of Goodies- Day 6: Almond Lace Trumpets


Wow, so I'm cutting it pretty close today for my daily Christmas goodie post. And as exhausted as I am, I'm dedicated to sharing something yummy with you each and every day until Christmas. I've been in the kitchen for 30 straight hours, prepping to cater my fourth and final party scheduled within the last 8 days. And this one was the largest party I've done yet. You should see my hands. They are utterly and completely raw from all the hand washing and dish washing I've done over the past two weeks. It's rather excruciating. Actually, if there are any professional caterers reading this, or any one for that matter, who could so kindly impart some sage advice on how to keep my hands moisturized during the winter when I'm constantly washing them, I would be forever grateful.

So anyways, these delicate little cookies are something I've been wanting to make for quite some time now. I think it was on a special holiday edition of Iron Chef America where I first saw these. Paula Deen and Cat Cora were teamed up; I remember watching Paula filling these delicate looking trumpet things with lots of fluffy looking frosting. That memory has been dancing around in my head for awhile now and I thought this Christmas, it was finally time to give them a try. However, I wasn't wild about the recipe I found in Food Network, courtesy of Miss Paula Deen, so I changed it up a bit to fit my liking.


Almond Lace Trumpets with Orange Buttercream Frosting
Recipe adapted from Paula Deen for Food Network

Ingredients
For the cookies:
1/2 cup sugar
1 stick unsalted butter
1/3 cup dark corn syrup
3/4 cup all-purpose flour
1/2 teaspoon ground cinnamon
1 tablespoon almond liqueur
½ tsp almond extract
¼ tsp salt

For the filling:
2 sticks unsalted butter, room temp
½ teaspoon salt
6 cups powdered sugar
7 tablespoons orange juice
2 tbsp heavy cream
2 teaspoons vanilla extract
2 teaspoons orange zest
1 teaspoon lemon zest

Directions:
1. Preheat the oven to 350º. Line a cookie sheet with foil; grease foil well (or use a silpat).

2. In a medium saucepan, combine the sugar, butter and corn syrup. Cook the mixture over low heat until the butter melts; remove from the heat.

3. Mix the flour, cinnamon, and salt in a bowl. Add to the butter mixture, stirring well. Stir in the liqueur and almond extract, if desired. Drop the batter by rounded teaspoonfuls, 3 to 4 inches apart, onto the prepared cookie sheet. (Bake only 2 or 3 cookies at a time; you must form the cones quickly before they cool.) Bake until the cookies spread and are bubbly and golden brown, 9 to 10 minutes.

4. Let the cookies sit for approximately 1 minute (no more). Then, working quickly, flip one cookie over and swiftly but gently wrap cookie around a metal cream horn. (If a cookie gets too brittle to roll, return to the oven for 1 minute.) Once set, slide the cookie off the metal cone and cool on a wire rack. Repeat with remaining cookies.

To Make the filling:

Beat the butter and salt until creamy. Beat in the powdered sugar, orange juice, heavy cream, and vanilla extract. Add the orange and lemon zest to taste, and mix well to combine

Prepare a pastry bag with a star shaped tip (I used a Wilton #32) and coupler. Fill the bag with about 1/3 of the icing and then apply pressure to fill the lace trumpets. Do not completely fill each trumpet, as the icing is very rich. Repeat until all trumpets are filled. (You may have some icing left over).

Makes about 30 cookies

December 17, 2009

12 Days of Goodies- Day 5: Christmas Brownie Pops


Ok, so I don't usually like to toot my own horn, but these are pretty darn cute, aren't they? So cute in fact, that they have actually won me some awards. Ok, not really. My mom hosts a Christmas cookie exchange party every year, where people nominate and vote on cookies in several different categories: "most effort", "best looking", "best tasting", you get the idea. And even though I am technically not allowed to win in any of these categories, I always enter in hopes of secretly winning. Prize or no prize, I just want the title and prestige. Well, this year I won, in almost every category, but I so graciously stepped down from my throne to the runners up. Like I said, I don't need a prize. Just the glory.


I realized when getting ready to post this particular sweet treat, that I don't necessarily have a recipe to share with all of you. (I used a boxed brownie mix, gasp! But it was Ghiradelli, so that's a little better, right?) I guess all I can do is pass along my decorating techniques, so that you too can impress a crowd with these adorable Christmas goodies. And surprisingly enough, they didn't take near the amount of time that I was counting on. Two to three hours, yes, but I was estimating around four to five. So if you've got some extra time this week, I suggest you give these a try, because I promise you, people will think you've somehow gone and become a professional baker!


Snowman and Santa Brownie Pops

What You'll Need:
2 boxes of brownie mix and the necessary ingredients to go with it (eggs and oil)
a Wilton brownie pop mold
candy pop sticks
vanilla confectionary coating (Ghiradelli recommended)
red confectionary coating (Ghiradelli recommended)
Americolor pink and orange oil based dye, (to make a flesh toned coating for Santa)
dark chocolate confectionary coating (for the eyes and santa's smile)
red and green round sprinkles
Optional: carrot shaped sprinkles for the snowman's nose (or you can use the orange dye to make a small amount of orange tinted confectionary coating)
various cake decorating tips: #2, #3, #7
disposable pastry bags
wax paper

Directions:

1. Mix together the brownie mix according to the package directions. Fill the brownie pop mold about 2/3 full and bake according to brownie package directions, but adjust the baking time as necessary. (I heated my oven to 325º F and baked each batch for 25 minutes. There are only 8 cavities in the brownie pop mold, so I had to make 4 batches).

2. After the brownies have cooled, insert a candy stick into the rounded top of each brownie.

3. For the snowman: melt the vanilla confectionary coating in a tall coffee mug in the microwave. Carefully immerse each brownie pop into the melted coating, and set on wax paper to dry. Before the white coating is completely dry, place a carrot sprinkle and 2 green round sprinkles (for the buttons) on each coated brownie. Melt the red confectionary coating in the same manner. Spoon the melted red coating into a disposable pastry bag fitted with a coupler and a #7 Wilton cake decorating tip. Draw on a scarf around the circumference of the brownie. Melt the dark chocolate coating, place in a pastry bag fitted with a #2 tip, and dot 2 eyes on each snowman. Let dry completely and enjoy!

4. For the Santa: Melt vanilla confectionary coating in a tall coffee mug in the microwave. Depending on how much confectionary coating you melt, place a tiny amount of pink and orange dye into the mug and mix to create a flesh tone. (I melted approximately 8 oz of vanilla coating and used about 2 small drops of pink and 3 small drops of orange). Immerse each brownie pop into the melted coating. Place on wax paper to dry completely. Melt red confectionary coating in the same manner. Scoop into a disposable pastry bag fitted with a coupler and #7 Wilton cake decorating tip. Draw on a hat on top of each coated brownie. Melt dark chocolate coating, place in a pastry bag fitted with a #2 tip, and draw on eyes and a small smile on each brownie. Next, melt more vanilla coating, place in a pastry bag fitted with a #3 tip, and do small dots to create a beard. If the dots start to melt together, use the cake tip to pull the chocolate upwards to create little white tips. Lastly, place a red round sprinkle on the white beard, above the smile, for a nose. Let dry completely and enjoy!

* If you live in the Dallas area, I got most of my supplies at Cake Carousel (if you like to bake, this is a really cool store to check out!) If not, order supplies from NY Cake. Visiting the store in person is so much better, but their website can still help you take care of all your baking needs!

December 16, 2009

12 Days of Goodies- Day 4: Chocolate Ganache Truffles


As much as I love sweets and trying new and different baked treats, I always come back to the tried and true chocolate. Sometimes, when that hankering for something sweet kicks in, nothing can hit the spot like a good piece of dark chocolate. And I don't particularly mind what vessel that dark chocolate comes in, be it a liquid, a bar, or candy coated. But there is something slightly better than pure dark chocolate. Chocolate mixed with heavy cream, thus creating one of the most heavenly things on earth... ganache. The word alone drips with decadence. So when I went in search of that perfect bite of chocolate, I immediately turned to Ina Garten. Of course, not to my surprise, I was able to find a recipe for chocolate truffles that seemed as easy as they did delicious. I am usually game for a challenge in the kitchen, but when you sign up to bake something 12 days in a row, taking the easy road every now and then only seems sane. But come to think of it, simplicity and chocolate really go hand in hand. Chocolate is often best enjoyed in its natural state, without all the fuss.


Chocolate Ganache Truffles
Recipes (slightly) adapted from Ina Garten, courtesy of Food Network

Ingredients:
1/2 pound good bittersweet chocolate (I used Ghiradelli)
1/2 pound good semisweet chocolate (I used Ghiradelli)
1 cup heavy cream
2 tablespoons orange flavored liqueur, optional (recommended: Grand Marnier)
1 tablespoon prepared coffee
1/2 teaspoon good vanilla extract
confectioners’ sugar
sweetened cocoa powder

Other optional coatings:
toasted coconut
toasted, chopped almonds, peanuts, or hazelnuts
chopped toffee bits

Directions:
1. Chop the chocolates finely with a sharp knife, or in a food processor. Place in a heat-proof mixing bowl.

2. Heat the cream in a small saucepan until it just boils. Turn off the heat and allow the cream to sit for 20 seconds. Pour the cream through a fine-meshed sieve into the bowl with chocolate. With a wire whisk, slowly stir the cream and chocolates together until the chocolate is completely melted. Whisk in the orange flavored liqueur, if using, coffee, and vanilla. Cover and chill in the fridge for at least 1 hour.

3. Mix about 1/3 cup confectioner's sugar with 3/4 cup sweetened cocoa powder in a shallow dish. With a melon baller or small cookie dough scoop, spoon round balls of the chocolate mixture onto a baking sheet lined with parchment paper. Roll each ball of chocolate in your hands to make it round. Roll in the confectioners’ sugar-cocoa powder mix, or try one (or all!) of the other optional coatings. Store rolled truffles in an airtight container and they will keep for weeks in the refrigerator, but serve them at room temperature.

Makes bout 35-40 truffles

December 15, 2009

12 Days of Goodies- Day 3: Caramel-Pecan Bars


It's only day three and I already feel my pants getting ever so snug. But it's Christmas time, so I'm doing my best to throw those concerns to the curb, at least until January 1st when I, like most others, hop on the diet band wagon (only to fall off a couple of days later in order to feed my insatiable sweet tooth). So in the mean time, I'm doing my best to enjoy the calorie-loaded goodies with as little guilt as possible, which is hard to do when these caramel-pecan bars are sitting around in the kitchen. Enjoying them is easy... without any guilt... not so much. Have I yet to mention how much butter I've gone through since the holidays began? Well, I think it's best to keep that information to myself. Let's just say I've been to Costco several times during the month of December, and have yet to leave without a 4 lb. bundle of butter in my basket. 


However, the crust in this recipe is so delicious, you won't mind how much butter is actually in it. I'm fairly new to the pastry-making process, and this recipe seemed a little odd to me when it called for vinegar. Perhaps it's not a very unique ingredient to be in a pie crust, but I personally have never made a pastry that called for vinegar. The finished product was so delectably tangy. I actually found myself peeling the crust off the bottom and leaving the caramel and pecans behind for someone else to eat. Maybe not the most mannerly or polite thing to do, but hey, I made them, so I'm entitled to the crust if I want it, right? I think so. Or at least I'll keep telling myself that. 


Caramel-Pecan Bars
Recipe from Food & Wine Magazine December 2009

Ingredients:
Crust-
2 1/4 cups all-purpose flour
1/2 cup sugar
3/4 teaspoon salt
1 1/2 sticks cold unsalted butter, chilled and cut into cubes
1/4 cup ice water, as needed (I used about 2 tablespoons)
1 tablespoon distilled white vinegar
Topping-
1 1/2 sticks unsalted butter
1 1/4 cups light brown sugar
1/2 cup honey
1/2 teaspoon salt
1 cup heavy cream
1 pound pecan halves

Directions:
1. To make the crust: in a food processor, pulse the flour with the sugar and salt. Add the cubed butter and process until the mixture resembles coarse meal. Sprinkle on the ice water and vinegar and process until the crumbs are evenly moistened. Turn the crumbs out onto a sheet of wax paper and knead just until the dough comes together. Pat the dough into a disk, wrap in plastic and refrigerate until slightly chilled, about 30 minutes.

2. Preheat the oven to 375°. Line the bottom of a 9-by-13-inch metal baking pan with parchment paper. Roll out the dough between 2 sheets of wax paper to an 11- by-15-inch rectangle (1/4 inch thick). Trim the dough to a 9-by-13-inch rectangle and place it in the baking pan. Cut the remaining dough into 3/4-inch-wide strips and press them up the side of the pan to form a rim all around. Refrigerate the dough until firm, about 30 minutes.

3. Line the dough with parchment paper and fill with pie weights or dried beans. Bake for about 15-20 minutes, until the dough is just set. Remove the parchment paper and weights and bake the crust for about 10 minutes longer, until lightly golden and set. Let cool.

4. To make the topping: in a large saucepan, combine the butter, brown sugar, honey and salt and cook over moderate heat, stirring, until melted and slightly foamy, about 5 minutes. Add the cream and cook, without stirring, until a candy thermometer inserted in the caramel registers 240° (soft ball stage), about 10 minutes longer. Add the pecans and cook for 2 minutes longer. Pour the filling over the crust, spreading it evenly. Bake for about 15 minutes, until the crust is golden and the topping is bubbling. Let cool completely. Slide the parchment onto a cutting board. Cut into bars and serve.

The bars can be stored in an airtight container at room temperature for up to one week.

Makes 16 bars

December 14, 2009

12 Days of Goodies- Day 2: Bizcochitos


So on to day two, and feeling a wee bit more rested than I was from day one! Which is a good thing since I have 10 more days to go and many more things to accomplish this holiday season. Nevertheless, I love the holidays. The general spirit in the air, the gift giving (and receiving...), and how this time of year makes for an excellent excuse to bake and eat an obscene amount of sweets. I religiously flip through and browse food magazines and websites, and thus have accumulated quite a large stack of recipes I eventually want to try. Sometimes those recipes are added to the bottom of the pile, only to slowly work their way up, but other times, a special recipe might grab my attention and get ushered straight to the top.


This recipe for bizcochitos (pronounced bees-ko-CHEE-toh) did just that. The story behind these little cookies and the flavors they promised were too intriguing to put off until later. It seemed fitting for the occasion too since it is usually served on special occasions such as Christmas. The bizcochito is of Spanish origin and was named the official state cookie of New Mexico about 20 years ago. The ingredients are equally as interesting: anise, sherry, cinnamon-sugar served along side a dipping sauce of chocolate, coffee, and cayenne. The results were as expected; they were delicious, of course, but the bizcochito was also light, crisp, and completely complex. Each bite kept my taste buds guessing and yearning for just one more cookie, dipped in a rich, and equally as complex chocolate sauce.


Bizcochitos with Mexican Chocolate Dipping Sauce
Recipe Courtesy of Cuisine At Home


Ingredients:
3 cups all-purpose flour
1 tsp baking powder
1/2 tsp salt
2/3 cup vegetable shortening
6 tablespoons unsalted butter
3/4 cup sugar
1 egg
2 tablespoons dry sherry
2 tsp anise extract
2 tablespoons anise seed

For the coating:
1/4 cup sugar
1 tsp ground cinnamon

Directions:
1. Whisk together the flour, baking powder, and salt; set aside.

2. Using a hand mixer on medium speed, cream shortening, butter, and sugar together until mixture is light and fluffy, about 5 minutes. Scrape down sides of the bowl. Beat egg, sherry, and anise extract into shortening mixture. Add anise seed and half of the flour mixture; beat on low speed until ingredients are blended. Beat in remaining flour mixture until dough pulls away from the sides of the bowl.

3. Divide dough in half. Shape each half into a disk; wrap in plastic. Chill dough at least 2 hours before rolling out. (Dough may be frozen up to one month; thaw overnight in the refrigerator before rolling out.)

4. Preheat oven to 350º F. Coat baking sheets with nonstick spray.

5. On a well-floured work surface, roll out dough to a thickness of about 1/8 inch. Shape cookies using a metal ruler, and cut the dough into parallel 1-inch strips, then again at an angle to form diamonds. Transfer cookies to the prepared baking sheets using an offset spatula.

6. Bake cookies until set and lightly golden brown around the edges, 15-18 minutes. Let cookies cool on the baking sheet for 5 minutes.

7. Meanwhile, mix sugar and cinnamon in a bowl. Gently coat warm cookies in sugar mixture, then transfer cookies to a rack to finish cooling. Serve cookies with Mexican Chocolate Dipping Sauce (see below).

Makes about 100 two-inch cookies


Mexican Chocolate Dipping Sauce

Ingredients:
1 cup semisweet chocolate chips
2/3 cup heavy cream
2 tablespoons coffee liqueur
2 tsp ground cinnamon
pinch cayenne pepper

Directions:
1. Place all ingredients in a microwave safe bowl. Heat in the microwave for about two minutes. Whisk mixture until smooth.

December 13, 2009

12 Days of Goodies- Day 1: Homemade Marshmallows


Whew! What a week! I catered two dinner parties, ran a half marathon, then catered another party- this one for 50 people. And now? I'm back in the kitchen, of course. I can't help it. I inherited my mom's personal motto: no rest for the weary. Which is why after a completely exhausting week, I've set myself on a mission to bake, photograph, and post a new sweet treat daily leading up to Christmas Eve. But, as everyone knows, the holiday season is hectic enough without spending hours upon hours in a hot kitchen, so I'm going to have to keep these posts for the next 12 days short and sweet (no pun intended). I'm sure you don't mind that either, right?


So to kick off my 12 day sugar laden mission, I decided to make homemade marshmallows. Because what's Christmas time without hot cocoa and marshmallows? However, these marshmallows take hot chocolate to a whole other level. It goes from blissful beverage to decadent dessert. The marshmallows melt slowly, creating a frothy mallow-like-cream that coats the tongue with a hint of vanilla after each sip. It's insanely delicious! The only thing that is slightly more ludicrous than the taste, is the ease of this recipe. Homemade marshmallows are extremely simple to make, and more than worth the small amount of effort it takes to make them. And here's a little holiday hint: they make great little gifts to pass out to neighbors, friends, or co-workers. They'll think you're a rockstar in the kitchen for giving them homemade marshmallows, but little will they know, it took you all of 30 minutes.


Homemade Marshmallows
Recipe Courtesy of Alton Brown from Food Network

Ingredients:
3 packages unflavored gelatin
1 cup ice cold water, divided
12 ounces granulated sugar, approximately 1 1/2 cups
1 cup light corn syrup
1/4 teaspoon kosher salt
1 teaspoon vanilla extract
1/4 cup confectioners' sugar
1/4 cup cornstarch
Nonstick spray

Directions:
1. Place the gelatin into the bowl of a stand mixer along with 1/2 cup of the water. Have the whisk attachment standing by.

2. In a small saucepan combine the remaining 1/2 cup water, granulated sugar, corn syrup and salt. Place over medium high heat, cover and allow to cook for 3 to 4 minutes. Uncover, clip a candy thermometer onto the side of the pan and continue to cook until the mixture reaches 240º F, approximately 7 to 8 minutes. Once the mixture reaches this temperature, immediately remove from the heat.

3. Turn the mixer on low speed and, while running, slowly pour the sugar syrup down the side of the bowl into the gelatin mixture. Once you have added all of the syrup, increase the speed to high. Continue to whip until the mixture becomes very thick and is lukewarm, approximately 12 to 15 minutes. Add the vanilla during the last minute of whipping. While the mixture is whipping prepare the pans as follows.

4. Combine the confectioners' sugar and cornstarch in a small bowl. Lightly spray a 13 by 9-inch metal baking pan with nonstick cooking spray. Add the sugar and cornstarch mixture and move around to completely coat the bottom and sides of the pan. Return the remaining mixture to the bowl for later use.

5. When ready, pour the mixture into the prepared pan, using a lightly oiled spatula for spreading evenly into the pan. Dust the top with enough of the remaining sugar and cornstarch mixture to lightly cover. Reserve the rest for later. Allow the marshmallows to sit uncovered for at least 4 hours and up to overnight.

6. Turn the marshmallows out onto a cutting board and cut into 1-inch squares using a pizza wheel dusted with the confectioners' sugar mixture. Once cut, lightly dust all sides of each marshmallow with the remaining mixture, using additional if necessary. Store in an airtight container for up to 3 weeks.

Makes 6-7 dozen marshmallows, depending on size